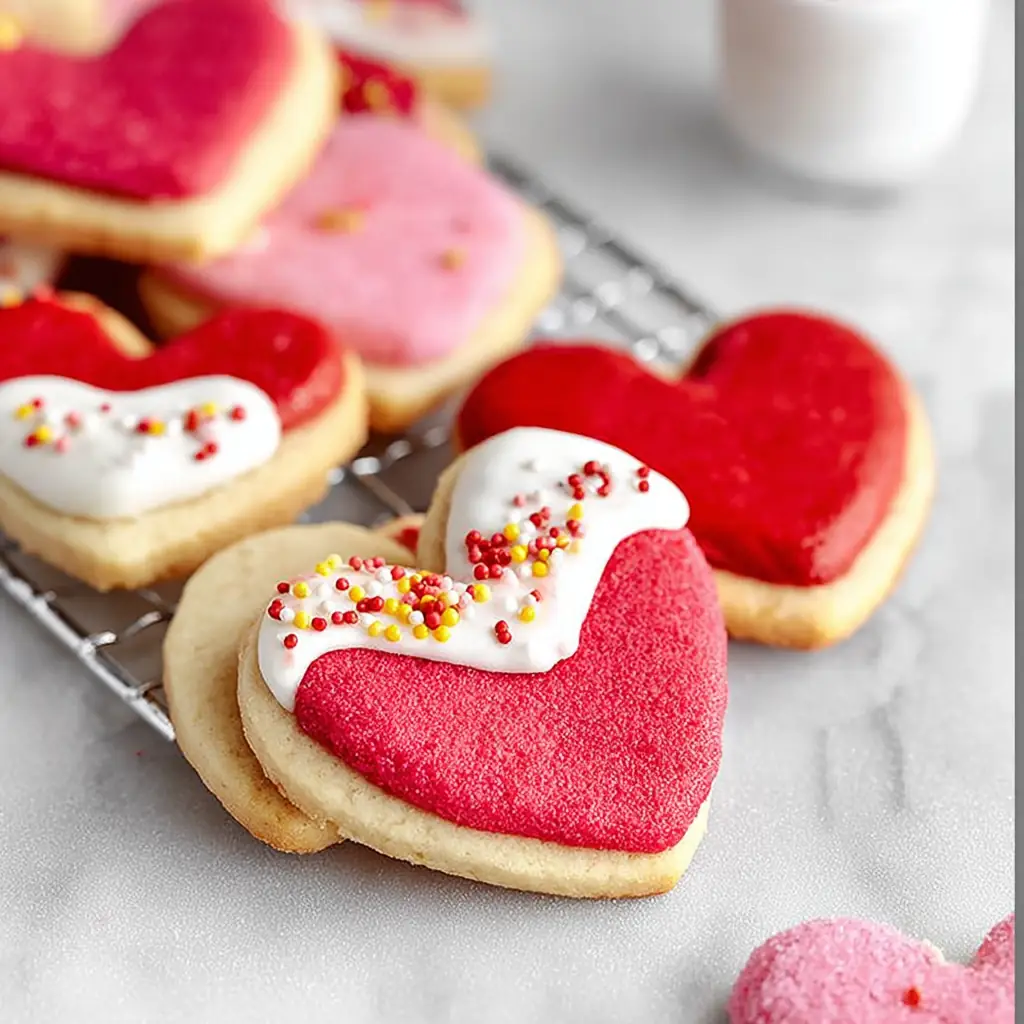
Valentine Shortbread Cookies
Valentine’s Day always brings back fond memories of my grandmother’s kitchen, where the smell of freshly baked cookies and the sight of heart-shaped treats were as sure as the love in the air. One weekend, nestled in her cozy kitchen, she taught me the art of shortbread cookies—a recipe so simple yet filled with warmth and affection. As I recreate these Valentine Shortbread Cookies, I’m reminded of those precious moments and the joy of sharing something sweet and homemade with those we love. These cookies, with their tender crumb and subtle sweetness, are perfect for Valentine’s Day or any day you wish to spread a little love.
Why This Recipe Works:
The beauty of these Valentine Shortbread Cookies lies in their simplicity and versatility. Here’s why this recipe is a winner:
Simple Ingredients: This recipe uses pantry staples, making it accessible and easy to whip up without a special trip to the store. Ingredients such as butter, sugar, vanilla extract, and flour are already mainstays in most kitchens, simplifying the preparation process.
Classic Texture: The cookies have a melt-in-your-mouth texture that is characteristic of a perfect shortbread. Shortbread is known for its buttery richness and tender crumb, a result of the perfect balance between fat and flour.
Customizable: The optional addition of red food coloring allows you to tailor the cookies to the occasion, making them festive and fun. Whether you’re making these for a Valentine’s Day treat or just because, the ability to customize them with colors and decorations makes them extra special.
Quick Preparation: With minimal prep and cook time, these cookies are ideal for a last-minute baking session. You don’t need to spend hours in the kitchen to produce a delicious homemade treat.
Versatile Icing: The royal icing is easy to work with and can be customized with different colors and decorations. Whether you prefer a simple white glaze or a multicolored masterpiece, the choice is yours.
Perfect for Sharing: These cookies make for wonderful homemade gifts, bringing a personal touch to any celebration. Pack them in a decorative tin or box, and you have a heartfelt gift that’s sure to impress.
Ingredients:
- ½ cup butter softened: Essential for that buttery shortbread flavor and texture.
- ¼ cup granulated sugar: Provides just the right amount of sweetness.
- 1 tsp vanilla extract: Adds a warm, aromatic note, enhancing the overall flavor.
- ¼ tsp red gel food coloring (optional): For a festive touch, especially perfect for Valentine’s Day.
- 1 cup all-purpose flour: The foundation of the cookie, giving it structure and support.
- Royal Icing (optional): For decorating, adding a touch of elegance and personalization.
- 2 cups confectioner’s sugar: Forms the base of the icing, ensuring smoothness and stability.
- 1½ tbsp meringue powder: Helps the icing set firm, making it perfect for detailed decorations.
- 4-5 tbsp room-temperature water: Adjusts the icing consistency to your liking.
- Food coloring (optional): Personalize your icing with colors of choice.
Step-by-Step Instructions:
Preheat your oven to 375F. Line a large baking sheet with parchment paper. This step ensures even baking and prevents the cookies from sticking to the tray.
In a stand mixer, beat the softened butter and granulated sugar until light and fluffy, approximately 2 minutes on medium-high speed. This creaming method is crucial for incorporating air into the mixture, giving the cookies their light texture.
Reduce the mixer speed to low, adding vanilla extract and red food coloring (if using). Mix until incorporated, scraping down the bowl’s sides. This ensures the vanilla and coloring are evenly distributed throughout the dough.
Gradually add the flour while the mixer is on low speed, mixing until a dough forms. Be careful not to overmix, as this can lead to a tough texture.
Wrap the dough in plastic and freeze for 15-20 minutes, just until it hardens slightly. Chilling the dough makes it easier to roll out and helps the cookies maintain their shape during baking.
Lightly flour your work surface and roll the dough to a ¼” thickness. Using a well-floured surface prevents the dough from sticking and tearing.
Use a heart-shaped cookie cutter to cut out cookies and transfer them to the baking sheet. This step is where creativity and precision come into play, as you shape your cookies into beautiful hearts.
Re-roll any remaining dough and continue cutting out cookies. Waste not, want not! This ensures you get the most out of your dough.
Bake for 10-15 minutes until the edges are golden brown. Keep an eye on them to avoid overbaking, which can lead to a dry cookie.
Cool completely before applying icing or decorating. This prevents the icing from melting off the cookies.
For the icing, combine confectioner’s sugar, meringue powder, and water in a mixer. Whip on high for 1-2 minutes until the mixture drizzles smoothly. Achieving the right consistency is key to beautifully decorated cookies.
Outline cookies with thicker icing, allowing it to set for 2-3 minutes. This creates a barrier that helps contain the flood icing.
Thin the remaining icing slightly and fill the outlined cookies. This technique, known as “flooding,” gives the cookies a smooth finish.
Add sprinkles immediately before the icing sets. This is your chance to add extra flair and creativity.
Refrigerate to speed up icing setting if desired. This step is optional but can be helpful if you’re short on time.
Prep Time: 30 minutes
Cooking Time: 15 minutes
Total Time: 45 minutes
Yield: 4-6 Servings
Table: Calorie Breakdown for a Typical Serving
| Nutrient | Amount per serving |
|---|---|
| Calories | 150 |
| Carbs | 20g |
| Protein | 2g |
| Fat | 7g |
| Sugar | 10g |
Patricia’s Tips for Success:
To ensure your Valentine Shortbread Cookies turn out perfectly every time, consider these tips:
Tip 1: Ensure the butter is properly softened for easy creaming. Ideally, take it out of the refrigerator about an hour before you start baking.
Tip 2: If the dough is too sticky, chill it longer to prevent sticking when rolling. This makes handling the dough much easier.
Tip 3: Use gel food coloring for vibrant color without altering dough consistency. Liquid coloring can alter the texture of the dough.
Tip 4: For even baking, make sure all cookies are of uniform thickness. This ensures they bake evenly and prevents some cookies from burning while others remain undercooked.
Tip 5: Adjust the icing consistency gradually; a little water or sugar can make a significant difference. Aim for a toothpaste-like consistency for outlining and a thinner, honey-like consistency for flooding.
Tip 6: Practice patience while icing; allow outlines to set before flooding. This helps prevent the colors from bleeding into each other.
Tip 7: Store cookies in an airtight container to maintain their crisp texture. If stored properly, they can last for up to a week.
Cooking Variations:
These cookies are a blank canvas, perfect for experimentation. Here are some variations to try:
Variation 1: Substitute almond extract for vanilla for a different flavor profile. Almond extract adds a nutty aroma that pairs beautifully with the buttery taste of shortbread.
Variation 2: Add a teaspoon of lemon zest to the dough for a citrusy twist. This adds a refreshing note that balances the sweetness.
Variation 3: Incorporate finely chopped nuts into the dough for added texture. Pecans or walnuts work particularly well.
Variation 4: Use dark chocolate chips to create a chocolate-dipped edge. Simply melt chocolate and dip half of each cookie for a decadent finish.
Variation 5: Experiment with different food coloring to match the occasion. Think pastels for Easter or vibrant greens and reds for Christmas.
Serving Suggestions:
While these cookies are delightful on their own, here are some serving ideas to enhance your presentation:
Suggestion 1: Pair with a cup of tea or coffee for an afternoon treat. The rich, buttery flavor of the cookies complements the bitterness of coffee or the subtlety of tea.
Suggestion 2: Serve alongside fresh strawberries for a romantic dessert plate. The combination is both visually appealing and delicious.
Suggestion 3: Gift in a decorative tin for a thoughtful Valentine’s Day present. Personalize it with a handwritten note to make it extra special.
Suggestion 4: Include in a dessert platter with other small pastries and chocolates. This creates a variety of flavors and textures for guests to enjoy.
Suggestion 5: Top with a dollop of whipped cream and a cherry for a festive touch. This is an easy way to dress up the cookies for a party or special occasion.
Additional Thoughts:
These Valentine Shortbread Cookies are not just a treat for the taste buds but also a feast for the eyes. Their simple elegance and the love with which they’re made can transform any day into a celebration. Baking them is a delightful activity that can be shared with family or friends, fostering connection and creativity. Don’t be afraid to experiment with colors and decorations—these cookies are your canvas! Whether you’re a seasoned baker or a kitchen newbie, this recipe is designed to be both easy and rewarding, ensuring your success and satisfaction every time.
Join the Conversation:
I’d love to hear your experiences with these Valentine Shortbread Cookies! Did you try any variations or put your own spin on the decorations? Share your stories, tips, or any questions you might have in the comments below. Let’s create a community of enthusiastic home bakers who inspire and support each other. I can’t wait to see what you’ve baked up!
Conclusion:
These Valentine Shortbread Cookies are a testament to the joy of baking and sharing love through food. Simple yet delicious, they offer a versatile base for creativity and personalization, making them perfect for any occasion. Whether you keep them classic or add your unique twist, these cookies are sure to delight anyone who tastes them. Their charm and flavor make them a go-to recipe for spreading love and joy.
Frequently Asked Questions:
Q: Can I make the dough ahead of time?
A: Yes, the dough can be prepared a day in advance and stored in the refrigerator. Just be sure to wrap it well to prevent it from drying out.
Q: How can I ensure my cookies keep their shape?
A: Chilling the dough before cutting helps maintain their shape during baking. Also, avoid overworking the dough as this can cause it to become too soft.
Q: Can I freeze the baked cookies?
A: Absolutely, freeze them in an airtight container for up to a month. Thaw them at room temperature before serving.
Q: What can I use instead of meringue powder for the icing?
A: Substitute with pasteurized egg whites for a similar effect. This will help the icing set firm, just like meringue powder.
Q: How do I adjust the icing consistency?
A: Add water to thin or sugar to thicken, adjusting gradually. It’s best to add small amounts and mix thoroughly to achieve the desired consistency.
Q: Why is my icing not setting properly?
A: Ensure the icing is whipped enough and adjust the water ratio if needed. Humidity can also affect how the icing sets, so consider the environment you’re working in.
Q: Can I skip the icing step?
A: Yes, the cookies are delicious plain or with a dusting of powdered sugar. They’re perfect for those who prefer a simpler presentation or want to save time.


Valentine Shortbread Cookies
Ingredients
Equipment
Method
- Preheat the oven to 375F. Line a large baking sheet with parchment paper.
- In the bowl of a stand mixer, beat together the softened butter and granulated sugar until light and fluffy– about 2 minutes on medium-high speed.
- Reduce the mixer to low speed, add the vanilla extract and food coloring, if using, and mix until incorporated. Scrape down the sides of the bowl.
- With the mixer still on low speed, slowly add the flour. Mix just until the dough has come together in a ball.
- Wrap the dough in plastic wrap and place it in the freezer to chill for 15-20 minutes, or until it has hardened slightly.
- Lightly flour your work surface and roll the dough out until it is ¼” thick.
- Cut the cookies using a heart-shaped cookie cutter that is about 2” across.
- Transfer the cut cookies to the parchment-lined baking sheet.
- Re-roll any leftover dough and repeat the cutout process.
- Bake the cookies for 10-15 minutes (depending on the size of your hearts), or until the edges are starting to turn golden brown.
- Allow the cookies to cool completely before adding icing or decorating.
- Store in an airtight container at room temperature for up to 2 days.
- Combine the sugar, meringue powder and water in the bowl of a stand mixer fitted with the whip attachment or in a medium mixing bowl – you’ll need a hand mixer.
- Whip the ingredients together on high for 1-2 minutes or until the mixture has the consistency to drizzle down back into the bowl and smooth out within a couple of seconds.
- Depending on the climate you may need to add more water or confectioner’s sugar (very small amounts at a time).
- Transfer a portion of the icing to a squeeze bottle and outline the cookies. You’ll want a thicker consistency for this step.
- Once the cookies are outlined the icing should harden within 2-3 minutes.
- Thin out the icing slightly with a little bit more water and then transfer to another squeeze bottle.
- Fill in the outlined cookies – this is called flooding. The icing should be nice and smooth and sort of pour into and fill the area you have outlined. The thicker icing you added earlier should hold it all in.
- Immediately add any desired sprinkles to the icing – before moving on to the next cookie as the icing will harden before you are done with all of the cookies and the sprinkles won’t stick.
- You can refrigerate the cookies to speed the process of setting the icing if desired.