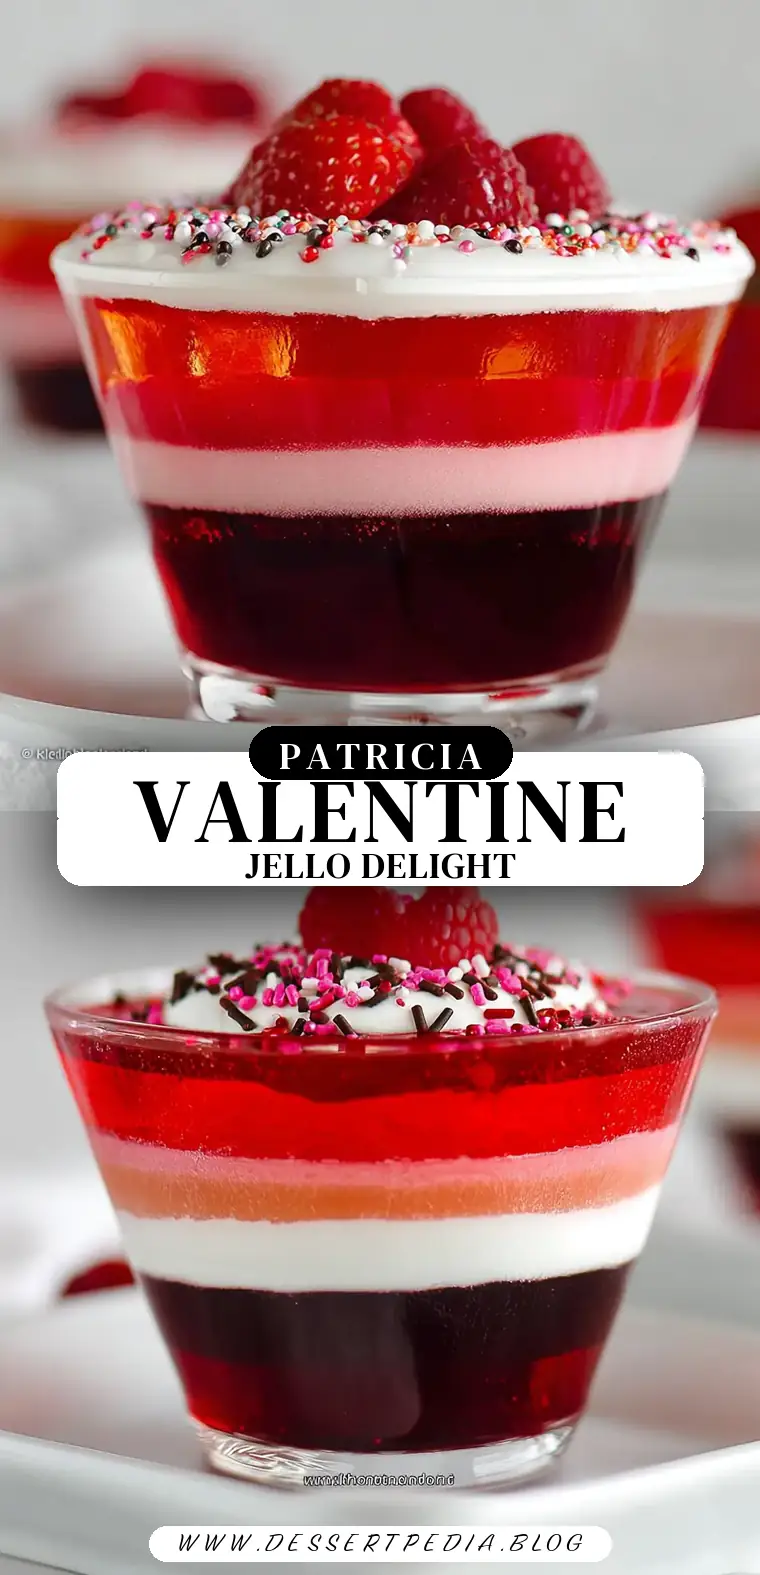
Valentine Layered Jello Recipe
Valentine Layered Jello Recipe: A Nostalgic Dessert with a Modern Twist
Valentine’s Day often brings a flood of memories and emotions, reminding us of special moments with loved ones. For me, it’s a time to reflect on the cozy weekends spent in my grandmother’s kitchen, where the sweet aromas, vibrant colors, and her warm smile made every moment unforgettable. This Valentine Layered Jello Recipe is my attempt to capture that nostalgia and introduce a playful twist, making it perfect for today’s celebrations. Despite its simplicity, layered jello is a dessert that bursts with flavor and adds elegance to any table. Whether you’re planning an intimate dinner or a fun family gathering, this recipe is a delightful way to express love and creativity.
Why This Recipe Works:
Crafting a dessert that resonates with everyone at the table involves more than just taste; it’s about creating an experience. Here’s why this Valentine Layered Jello Recipe stands out:
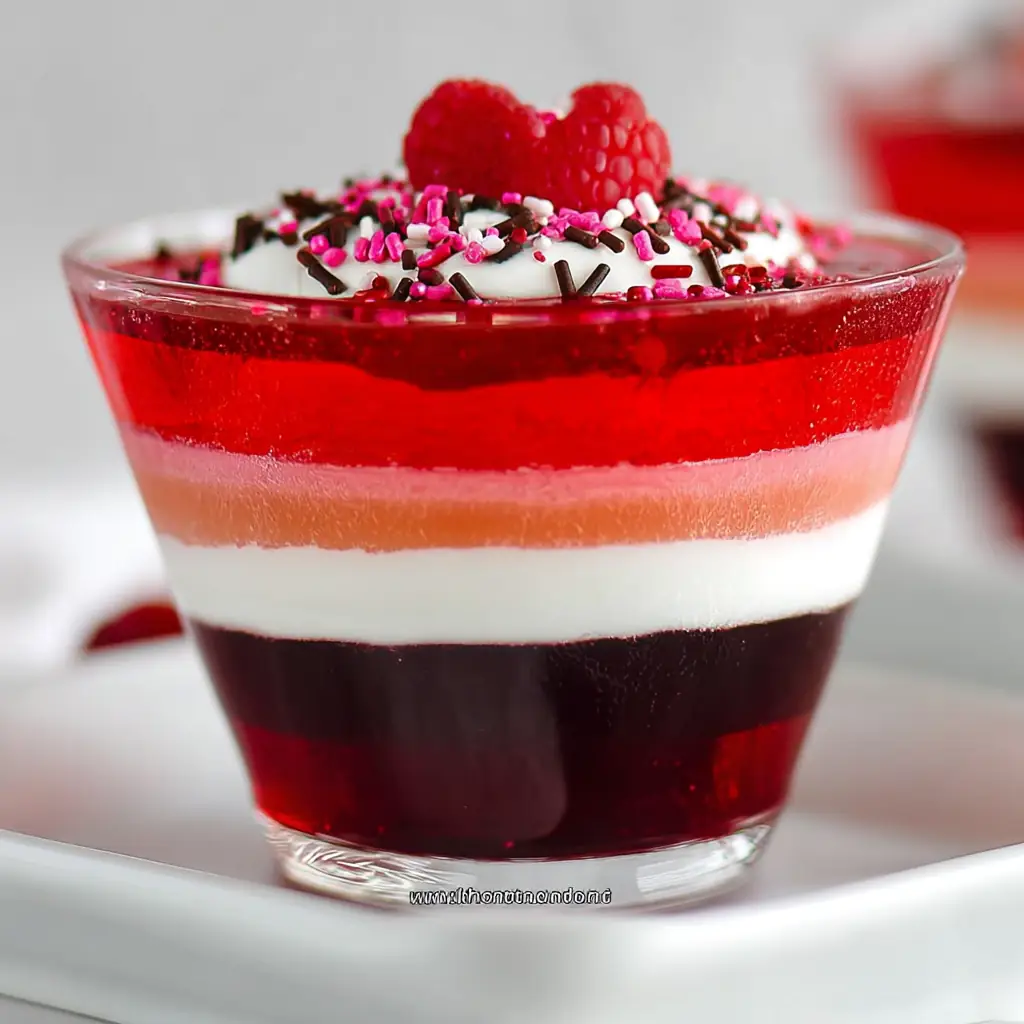
- Eye-catching Layers: The vibrant red shades are visually stunning, embodying the spirit of Valentine’s Day and making it a centerpiece-worthy dessert.
- Versatility: The recipe allows for customization of flavors and layers, accommodating personal tastes and time constraints.
- Ease of Preparation: With straightforward steps, it’s accessible for cooks of all skill levels, from novice to expert.
- Minimal Ingredients: Using just a few pantry staples, you can create a remarkable dessert that looks as impressive as it tastes.
- Make-Ahead Convenience: Preparing it in advance allows you to focus on other aspects of your meal or event.
- Fun for All Ages: The colorful and whimsical nature of this dessert makes it appealing to both kids and adults alike.
Ingredients:
To create this delightful dessert, you’ll need:
- 4 packages of jello: Choose a mix of strawberry, raspberry, and black cherry (3 ounces each) for a flavorful and colorful combination.
- 1 package whipped topping: 12 ounces, used to create creamy layers that add texture and richness.
- Whipped Cream (optional): For an extra layer of indulgence.
- Berries and Sprinkles (optional): These add a festive touch and fresh flavor.
Step-by-Step Instructions:
Prepare the First Layer: Begin by making one package of jello according to the instructions on the box. Typically, this involves combining the jello powder with 1 cup of boiling water and 1 cup of cold water. Divide the prepared jello between cups and refrigerate until set, about an hour.
Create the Creamy Second Layer: Prepare another package of jello as before, but this time, whisk in 6 ounces of whipped topping. Pour this mixture over the first set layer and chill for another hour until set.
Build the Third Layer: Repeat the process with the third package of jello, this time without whipped topping, for a clearer layer. Allow it to set in the refrigerator.
Complete with the Fourth Layer: For the final layer, prepare the last package of jello, incorporating the remaining 6 ounces of cool whip. Ensure each layer is fully set before adding the next.
Add the Finishing Touches: Top with whipped cream, sprinkles, or berries as desired. Serve chilled for the best experience.
Prep Time: 20 minutes
Cooking Time: 4 hours (chilling time)
Total Time: 4 hours 20 minutes
Yield: 4-6 Servings
Table: Calorie Breakdown for a Typical Serving
| Component | Calories | Carbs (g) | Protein (g) | Fat (g) | Sugar (g) |
|---|---|---|---|---|---|
| Jello Layer | 70 | 19 | 0 | 0 | 19 |
| Creamy Layer | 150 | 20 | 1 | 6 | 18 |
| Toppings (optional) | 50 | 8 | 0 | 3 | 5 |
Patricia’s Tips for Success:
Achieving the perfect layered jello requires a few tricks of the trade:
- Tip 1: Use clear cups to showcase the beautiful layers, enhancing their visual impact.
- Tip 2: Ensure each layer is fully set before adding the next to prevent the layers from mixing.
- Tip 3: Experiment with different jello flavors for a unique twist. This can be a fun way to personalize the dessert.
- Tip 4: Stir the whipped topping gently to maintain its fluffiness, ensuring smooth and creamy layers.
- Tip 5: Keep the jello refrigerated until ready to serve for optimal texture. Cold jello has the perfect consistency.
- Tip 6: Use a small ladle for even layer distribution, helping maintain clean lines between layers.
Cooking Variations:
- Variation 1: Add a touch of vanilla extract to the whipped topping for extra flavor depth.
- Variation 2: Substitute one layer with a different color for a surprise element. This can be particularly fun for themed parties.
- Variation 3: Use sugar-free jello for a lighter version, catering to different dietary needs without sacrificing flavor.
Serving Suggestions:
The presentation can elevate the dining experience:
- Suggestion 1: Serve in wine glasses for an elegant presentation, turning a simple dessert into a sophisticated treat.
- Suggestion 2: Pair with a sparkling rosé to complement the fruity flavors, enhancing the overall dining experience.
- Suggestion 3: Garnish with mint leaves for a pop of color and a hint of freshness.
Additional Thoughts:
Creating this Valentine Layered Jello Recipe is not just about the end result—it’s about enjoying the process. The act of layering, although simple, can be a meditative experience, allowing you to focus on the vibrant colors and the anticipation of each set layer. This dessert not only tastes delightful but also embodies the spirit of Valentine’s Day: sharing love through food. The layers, with their varying textures and flavors, mirror the complexities and joys of love itself.
Join the Conversation:
I would love to hear how your Valentine Layered Jello Recipes turned out, and any personal twists you might have added. Share your photos and experiences, and let’s celebrate the joy of cooking together. Your feedback enriches our community and inspires new ideas. Whether you stuck to the original recipe or added your own flair, every creation is a testament to the love and effort you put into it.
Conclusion:
This Valentine Layered Jello Recipe is a colorful, easy-to-make dessert that brings joy to any occasion. Its simplicity and elegance make it a perfect treat for Valentine’s Day or any day you wish to add a little extra love. The process of creating this dessert is as rewarding as enjoying the final product, offering an opportunity to express creativity and care.
Frequently Asked Questions:
Q: Can I make this recipe in a large dish instead of individual cups?
A: Absolutely! Just ensure each layer is fully set before adding the next. This approach can make serving easier in larger gatherings.
Q: How long can the jello cups be stored in the fridge?
A: They can be stored for up to 24 hours in advance, making them a convenient option for planning ahead.
Q: Can I use fresh whipped cream instead of store-bought whipped topping?
A: Yes, fresh whipped cream can be used, but it may alter the texture slightly, providing a more homemade touch.
Q: Can I add fruit between layers?
A: Yes, adding fruit can enhance flavor and texture. Just make sure each layer is set before adding fruit to avoid mixing.
Q: Is it necessary to use the same jello flavors mentioned in the recipe?
A: No, feel free to experiment with your favorite flavors for a personalized touch. This flexibility allows you to tailor the dessert to your taste preferences.
Enjoy making this delightful dessert, and may it bring as much joy to your table as it has to mine. Let this recipe be a reminder that love is not only in the grand gestures but also in the simple, thoughtful creations we make for those we care about.

Valentine Layered Jello
Ingredients
Equipment
Method
- Make one package of jello according to the instructions on the box (most likely, you’ll combine the jello powder with 1 cup of boiling water and 1 cup of cold water).
- Divide the jello between the cups and place it in the refrigerator to set– this should take about an hour.
- Make another package of jello according to the instructions on the box, whisk in 6 ounces of the whipped topping before pouring it over the first layer. Ensure the first layer is fully set before you pour another layer on top. Place the jello cups back in the refrigerator to chill for another hour, or until set.
- Repeat the layering and chilling process for the last two layers. The third layer will be a plain jello layer.
- The fourth layer will be a creamy layer (jello plus the remaining 8 ounces of cool whip).
- Make sure that each of the layers has firmed completely before moving on to the next.
- Lastly, top with whipped cream, sprinkles, or berries, if desired. Serve chilled.