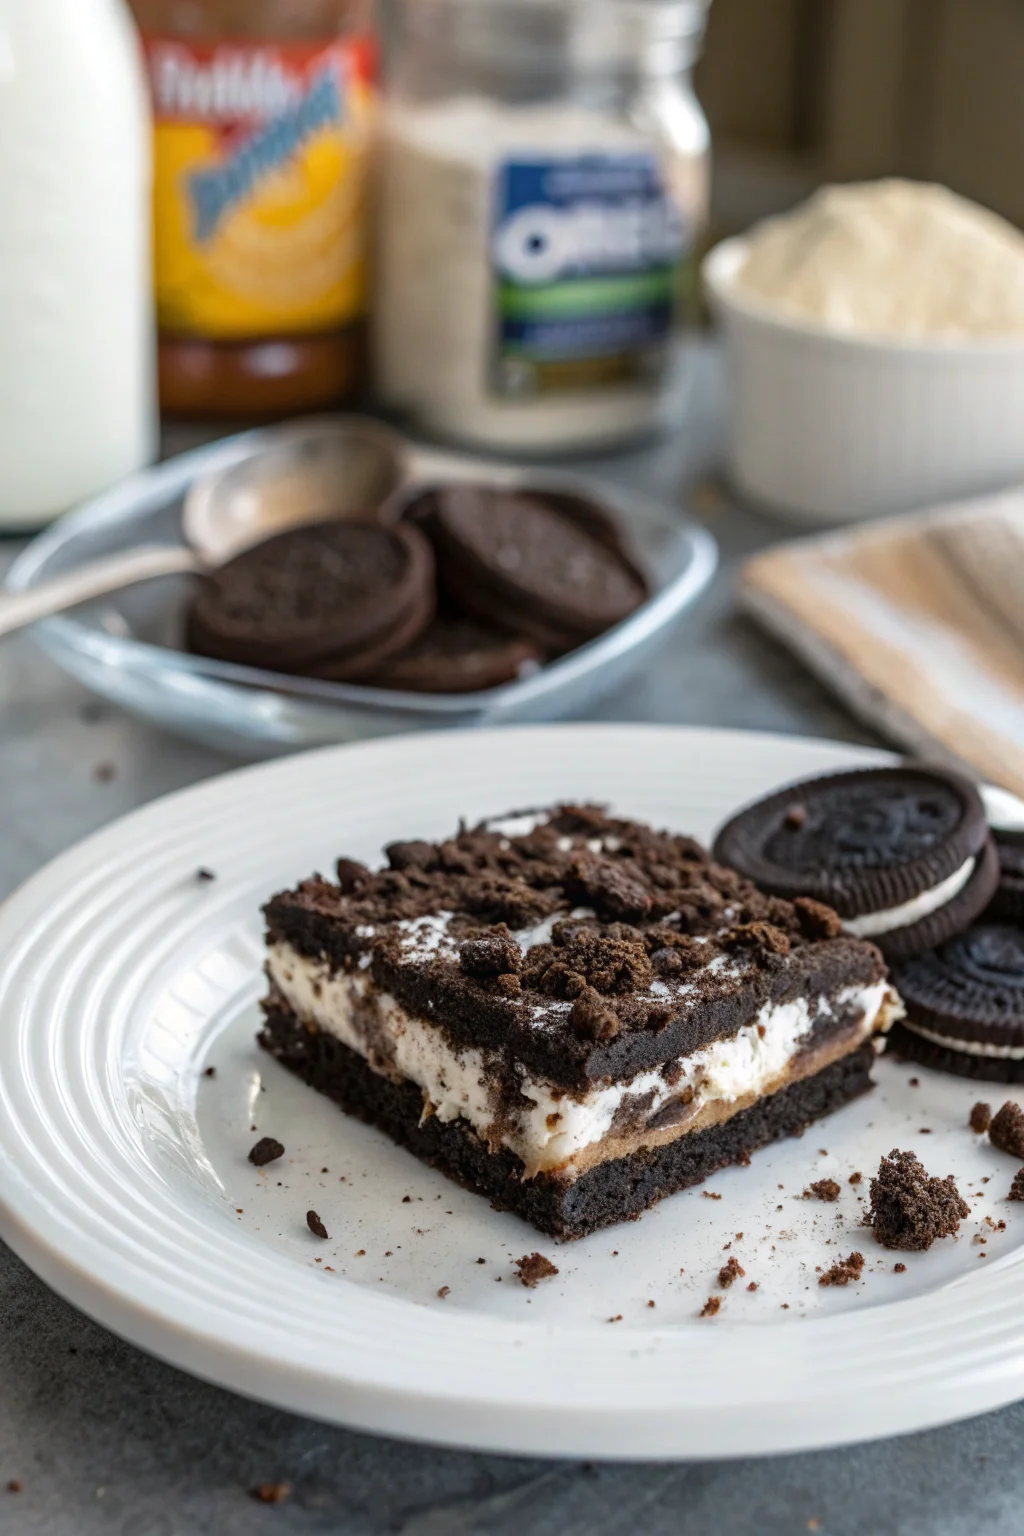
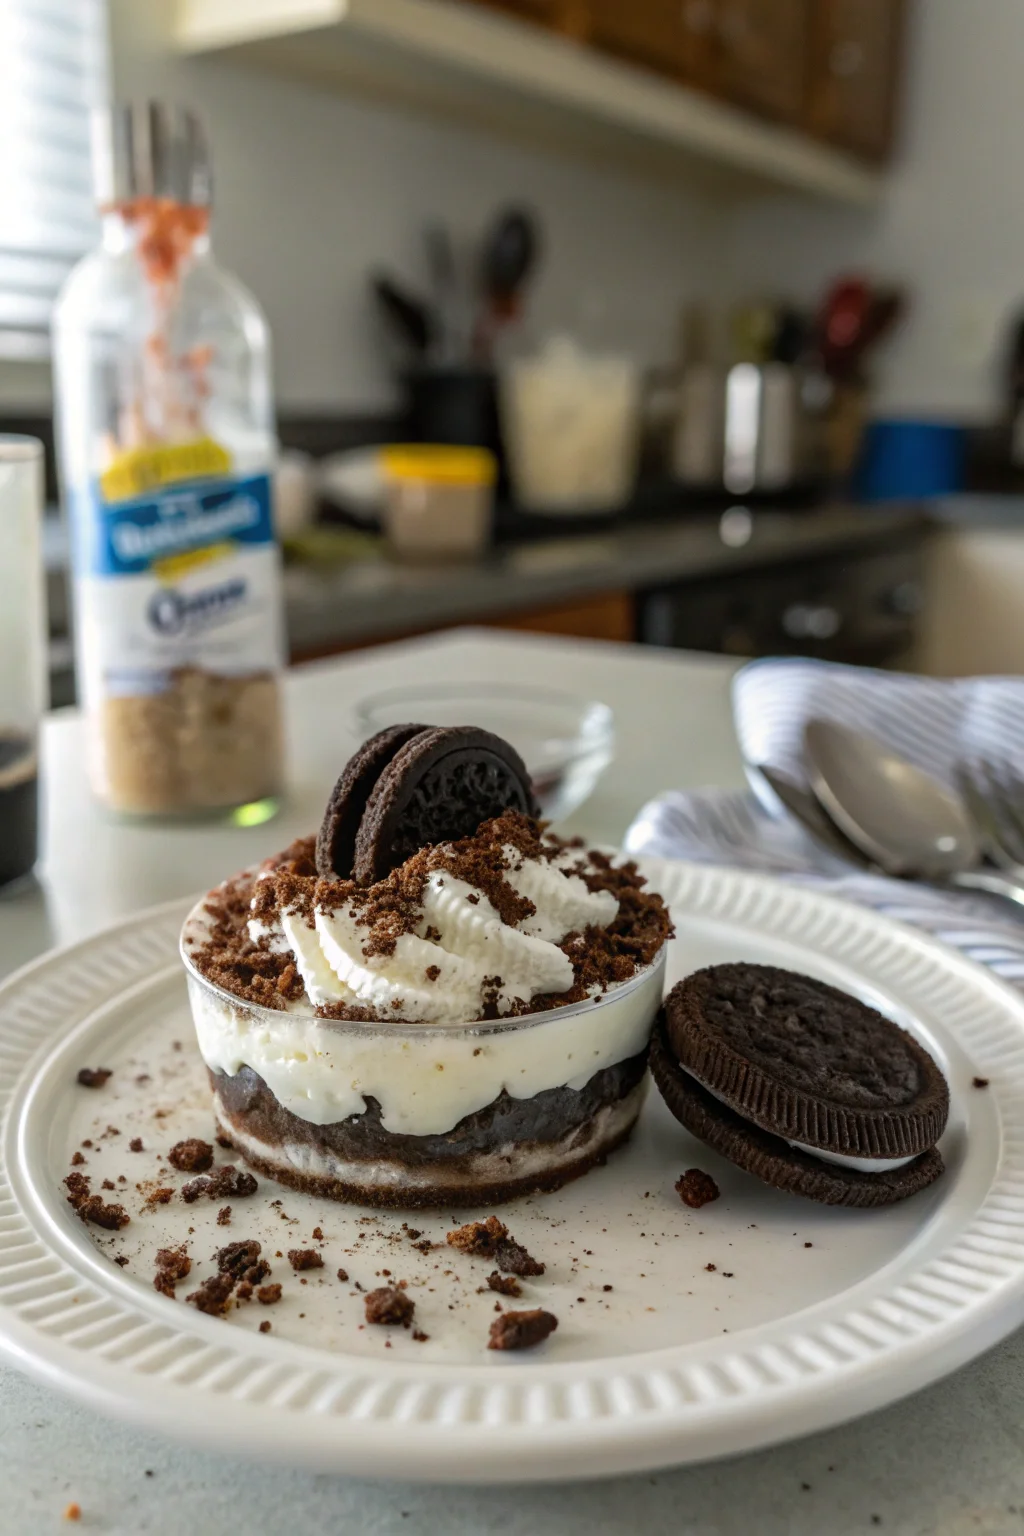
Heavenly Oreo Dessert
Welcome to another delightful journey into the world of desserts, where we transform simple ingredients into something truly magical. Today, we’re diving into the irresistible realm of the Heavenly Oreo Dessert, a no-bake wonder that promises to be the star of any gathering. This recipe is special to me because it brings back memories of weekends spent in my grandmother’s cozy kitchen, where the aroma of sweet treats filled the air and laughter was a constant companion. With its layers of creamy, crunchy, and chocolatey goodness, this dessert is a testament to the joy of creating something delicious with love and simplicity. Whether you’re an experienced baker or a novice in the kitchen, this dessert is designed to be approachable and rewarding, making it a perfect choice for any occasion.
Table of Contents
Why This Recipe Works
• Simplicity: With no baking required, the Heavenly Oreo Dessert is as easy as it is delicious, allowing you to focus on building flavors and textures without the hassle of an oven.
• Texture: The combination of crunchy Oreo crust and creamy layers provides a satisfying textural contrast that delights the palate.
• Flavor: The blend of chocolate, cream cheese, and Cool Whip creates a rich, indulgent dessert that pleases chocolate lovers everywhere.
• Presentation: With its layered structure, this dessert is visually appealing, making it an impressive addition to any dessert table.
• Make-Ahead: This dessert can be prepared in advance, allowing flavors to meld together, which is perfect for planning events.
• Crowd-Pleasing: Serving up to 24, this dessert is ideal for gatherings, ensuring everyone gets a taste of its heavenly goodness.
Ingredients
• 50 Oreo cookies: The star of the show, providing the perfect chocolatey crunch for the base and topping.
• ½ cup unsalted butter, melted: Helps bind the crushed Oreos into a sturdy crust.
• 8 ounces cream cheese, softened to room temperature: Adds a creamy, tangy layer that balances the sweetness.
• 1 cup confectioners’ sugar: Sweetens the cream cheese layer without being overpowering.
• 16 ounces Cool Whip (two 8-ounce tubs): Contributes to the light, fluffy texture in the cream cheese layer and topping.
• 6.8 ounces instant chocolate pudding (two 3.4-ounce packages): Provides a rich chocolate layer that complements the Oreo crust.
• 2½ cups 2% milk: Used to prepare the instant pudding, ensuring it’s creamy yet firm.
Step-by-Step Instructions
- Spray a 9×13-inch baking dish with nonstick spray to ensure easy removal of the dessert once set.
- Use a food processor to crush the 50 Oreo cookies into fine crumbs. This will create the base and a topping for the dessert. Set aside ¾ cup of these crumbs for later.
- Mix the remaining crushed Oreos with ½ cup of melted unsalted butter until well combined. This mixture forms the base, providing a rich, chocolatey foundation.
- Press the Oreo and butter mixture firmly into the bottom of the prepared baking dish. For a solid crust, use the back of a spoon or a flat-bottomed glass. Place this in the freezer for a few minutes to set.
- In a medium bowl, beat together 8 ounces of softened cream cheese and 1 cup of confectioners’ sugar until smooth and creamy. This mixture will become the second layer of our dessert.
- Gently beat in 1 tub (8 ounces) of Cool Whip into the cream cheese mixture for about 30 seconds. This adds lightness and helps it spread over the crust.
- Carefully spread the cream cheese mixture over the Oreo crust, ensuring even coverage. To avoid disturbing the crust, dollop the mixture in several places before spreading it out.
- In a separate bowl, beat together 2½ cups of 2% milk and the 6.8 ounces of instant chocolate pudding mix for about 2 minutes. This will be the third delicious layer.
- Spread the prepared pudding evenly over the cream cheese layer, creating a thick, chocolatey blanket.
- Top with the remaining tub of Cool Whip, spreading it evenly to cover the entire surface.
- Finally, sprinkle the reserved ¾ cup of Oreo crumbs over the top, adding a decorative and crunchy finish.
- Chill the dessert in the refrigerator for at least 6 hours before cutting and serving to allow it to set. For best results, refrigerate overnight to make slicing easier.
Prep Time: 15 minutes
Cooking Time: 0 minutes
Total Time: 6 hours 15 minutes
Yield: 24 Servings
Table: Calorie Breakdown for a Typical Serving
| Nutritional Component | Amount per Serving |
|---|---|
| Calories | 320 |
| Carbohydrates | 40g |
| Protein | 3g |
| Fat | 18g |
| Sugar | 25g |
Patricia’s Tips for Success
Tip 1: Ensure the cream cheese is fully softened to room temperature before mixing to prevent lumps in the cream cheese layer.
Tip 2: Press the Oreo crust firmly to avoid it crumbling when serving. A flat-bottomed glass works well for this.
Tip 3: When spreading layers, use a spatula to gently and evenly distribute each one without mixing them.
Tip 4: Allowing the dessert to chill overnight not only aids in setting but enhances the overall flavor as the layers meld together.
Tip 5: For a smoother pudding layer, whisk the milk and pudding mix vigorously to avoid any clumps.
Tip 6: If you don’t have a food processor, place the Oreos in a ziplock bag and crush them with a rolling pin.
Tip 7: Serve with a sharp knife wiped clean between each cut for neat slices.
Cooking Variations
Variation 1: For a minty twist, use mint-flavored Oreo cookies and add a few drops of peppermint extract to the cream cheese layer.
Variation 2: Incorporate a peanut butter spin by mixing a few tablespoons of peanut butter into the cream cheese layer, which pairs beautifully with chocolate.
Variation 3: Swap the Cool Whip with homemade whipped cream for a richer texture, adjusting sugar to taste.
Variation 4: Add a layer of sliced bananas or strawberries between the pudding and Cool Whip for a fruity surprise.
Variation 5: Use chocolate graham crackers instead of Oreos for a lighter crust with a different texture profile.
Serving Suggestions
Suggestion 1: Serve the Heavenly Oreo Dessert chilled, garnished with fresh berries or a drizzle of chocolate syrup to add a pop of color and enhance the presentation.
Suggestion 2: Pair with a hot cup of coffee or a refreshing glass of milk to balance the dessert’s sweetness and richness.
Suggestion 3: For a party, present the dessert in individual clear cups for a cute, grab-and-go option that showcases the beautiful layers.
Suggestion 4: Accompany with a scoop of vanilla or chocolate ice cream for an extra indulgent treat.
Suggestion 5: Offer alongside a selection of other no-bake desserts for a complete dessert buffet that caters to a variety of tastes.
Additional Thoughts
The Heavenly Oreo Dessert is more than just a delicious treat; it’s a creation that brings people together, sparking joy and nostalgia with every bite. As someone who finds solace in the kitchen, this dessert holds a special place in my heart. It’s reminiscent of simpler times when my grandmother and I would gather ingredients from her pantry, eager to create something sweet and satisfying. The beauty of this dessert lies in its versatility and ease — perfect for those moments when you want to impress without stress. It’s a reminder that cooking and baking are not just about the final product but the experience of crafting something with care and sharing it with loved ones. This recipe is a tangible expression of love, a testament to the power of food in creating memories and strengthening bonds. Whether you’re preparing it for a birthday party, a family gathering, or simply as a midweek treat, this dessert is sure to leave a lasting impression. Its layers of flavors and textures provide a delightful journey for the senses, inviting everyone to indulge in a little slice of heaven. With its straightforward preparation and stunning presentation, the Heavenly Oreo Dessert is a perfect illustration of how simplicity can lead to extraordinary results. So, gather your ingredients, channel your inner pastry chef, and let this dessert be the highlight of your culinary adventures. Remember, the joy of cooking comes not only from the act itself but from the smiles and satisfaction it brings to those who enjoy the fruits of your labor. In the end, this dessert is more than a recipe; it’s an opportunity to create, share, and savor every moment.
Join the Conversation
I’d love to hear your stories and see your creations! Have you made the Heavenly Oreo Dessert for your family or friends? What twists did you add to make it your own? Perhaps you have cherished memories of making desserts with loved ones, just like I do. Share your experiences and any tips you might have in the comments below. Let’s create a community of passionate home cooks who inspire each other with their culinary creativity. If you try this recipe, don’t forget to share your photos on social media and tag me at #TasteBudsApproved. Your feedback and stories make this journey so much more enriching and meaningful.
Conclusion
In conclusion, the Heavenly Oreo Dessert is a delightful testament to the joy of simple, no-bake treats that pack a punch of flavor and elegance. It’s the perfect go-to dessert for any occasion, whether you’re looking to impress guests or simply satisfy a sweet craving. With its easy preparation and crowd-pleasing appeal, this dessert embodies the essence of comfort and indulgence. As you embark on your dessert-making adventure, remember to savor each step and enjoy the process of creating something truly special. The beauty of cooking lies in its ability to bring people together, and this dessert is a perfect example of that magic. So, gather your ingredients, unleash your inner chef, and let the Heavenly Oreo Dessert transport you to a world of sweet bliss.
Frequently Asked Questions
Q: Can I use a different type of cookie for the base?
A: Yes, graham crackers or chocolate wafer cookies can be used as an alternative.
Q: How long can this dessert be stored in the refrigerator?
A: It can be stored for up to 3-4 days when covered tightly with plastic wrap.
Q: Can I make this dessert vegan?
A: Substitute vegan cream cheese, plant-based whipped topping, and non-dairy milk for a vegan version.
Q: Is it possible to freeze this dessert?
A: While it’s not recommended to freeze it due to texture changes, you can freeze individual portions if necessary.
Q: What if I don’t have Cool Whip?
A: You can use homemade whipped cream as a substitute, adjusting the sugar to taste.
Q: How can I prevent the crust from crumbling?
A: Press it firmly into the dish and allow it to chill sufficiently before adding the other layers.
Q: Can I add nuts to this dessert?
A: Yes, chopped nuts like pecans or walnuts can be sprinkled on top for added crunch.
Heavenly Oreo Dessert
Course: DessertCuisine: AmericanDifficulty: EasyIndulge in layers of rich chocolate cookies, decadent chocolate pudding, velvety cream cheese, and fluffy whipped cream in this Heavenly Oreo Dessert. A delightful treat that’s easy to make and impossible to resist!
Ingredients
50 Oreo cookies
½ cup unsalted butter, melted
8 ounces cream cheese, softened to room temperature
1 cup confectioners’ sugar
16 ounces Cool Whip (two 8-ounce tubs)
6.8 ounces instant chocolate pudding (two 3.4-ounce packages)
2½ cups 2% milk
Directions
- Spray a 9×13-inch baking dish with nonstick spray.
- Use a food processor to crush the Oreos until they are fine crumbs. Set aside ¾ cup of crushed Oreos for toppings.
- Mix the remaining crushed Oreos with melted butter.
- Press the Oreo and butter mixture into the bottom of the prepared dish and place it in the freezer for a few minutes.
- Beat together the cream cheese and confectioners’ sugar until smooth.
- Gently beat in 1 tub of Cool Whip for about 30 seconds until combined.
- Layer the cream cheese mixture over the Oreo crust, spreading it evenly over the crust.
- Dollop the cream cheese mixture in a few places to avoid disturbing the Oreo base.
- In a separate bowl, beat together milk and dry pudding packets for about 2 minutes.
- Spread the pudding evenly over the cream cheese layer.
- Top with the remaining tub of Cool Whip and sprinkle with the reserved Oreo crumbs.
- Chill the dessert for at least 6 hours before cutting and serving.
- For best results, refrigerate the dessert overnight to allow it to set and make slicing easier.