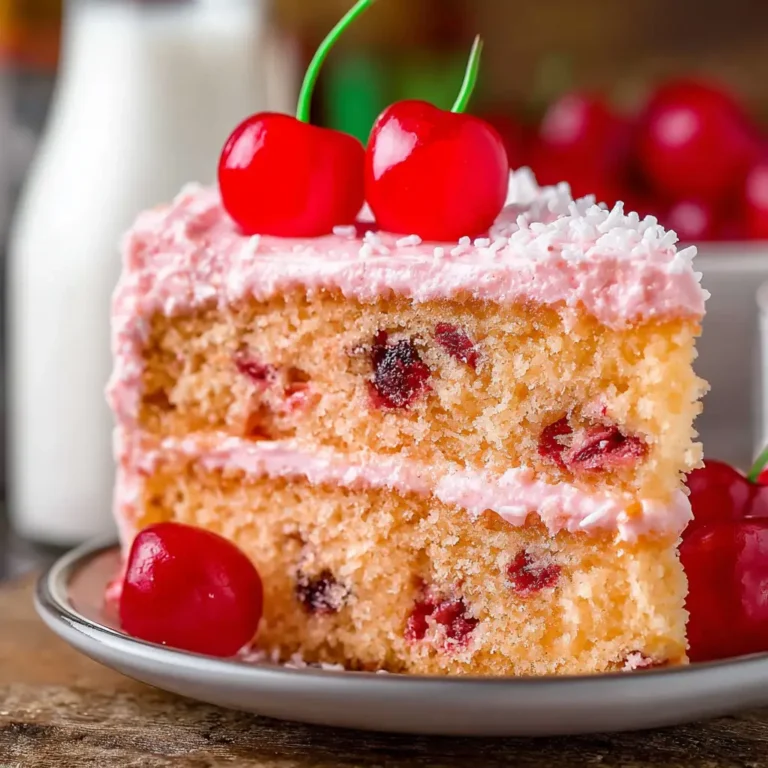
Cherry Delight
Nostalgia in Every Spoon: The Charm of Cherry Delight
Stepping into the kitchen on a leisurely weekend, I often find myself reminiscing about the delightful aromas of my grandmother’s home. Her kitchen was a treasure trove of sweet treats, with Cherry Delight being one of the most enchanting. This dessert, with its luscious layers and burst of cherry flavor, is a tribute to those cherished times. It’s an inviting dish that speaks of warmth and tradition, bringing generations together with each spoonful.
The Story Behind Cherry Delight
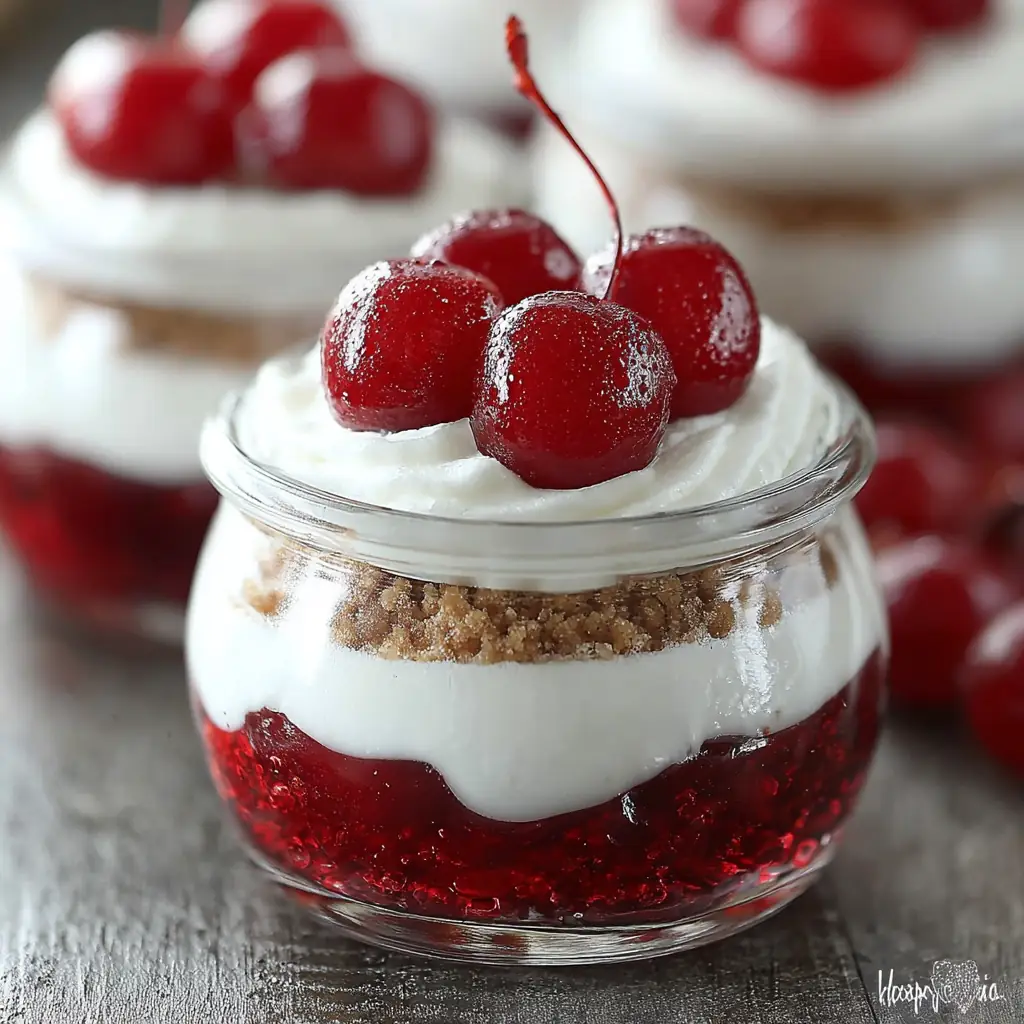
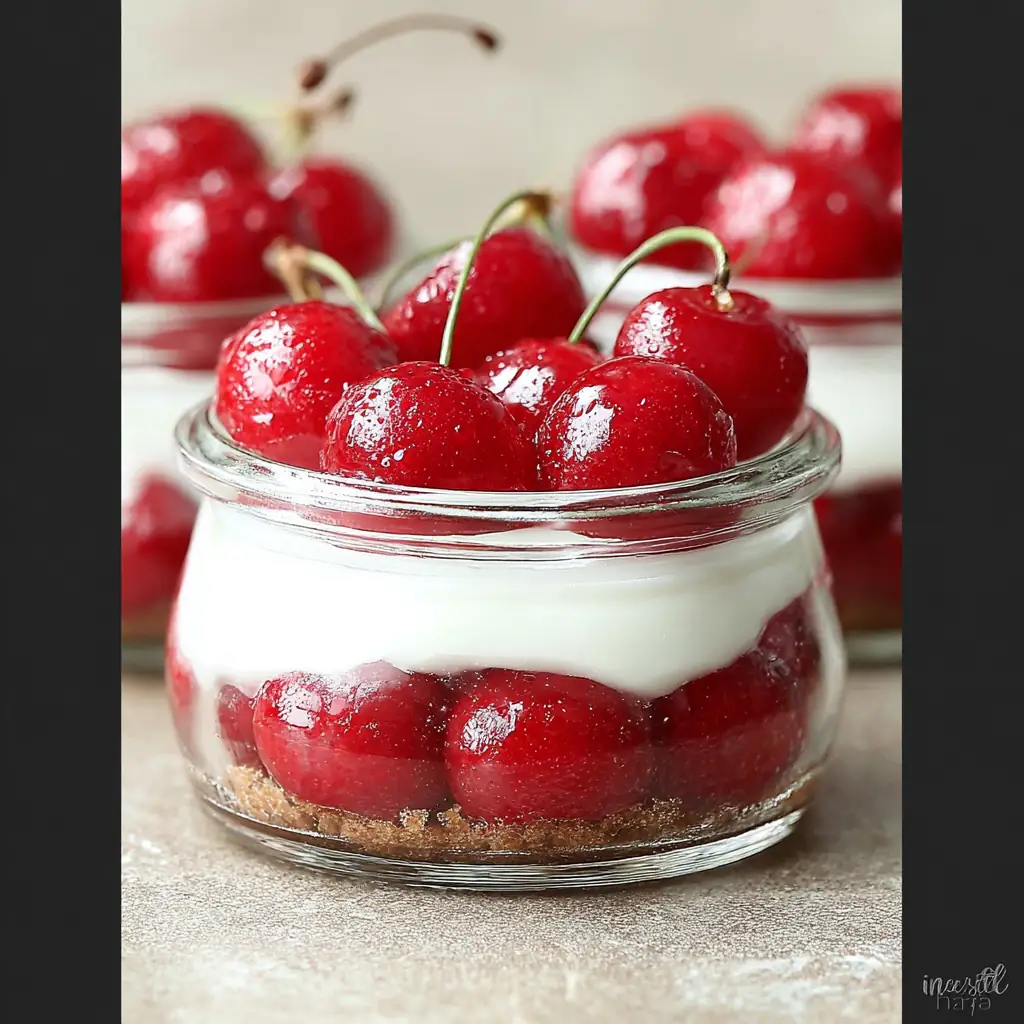
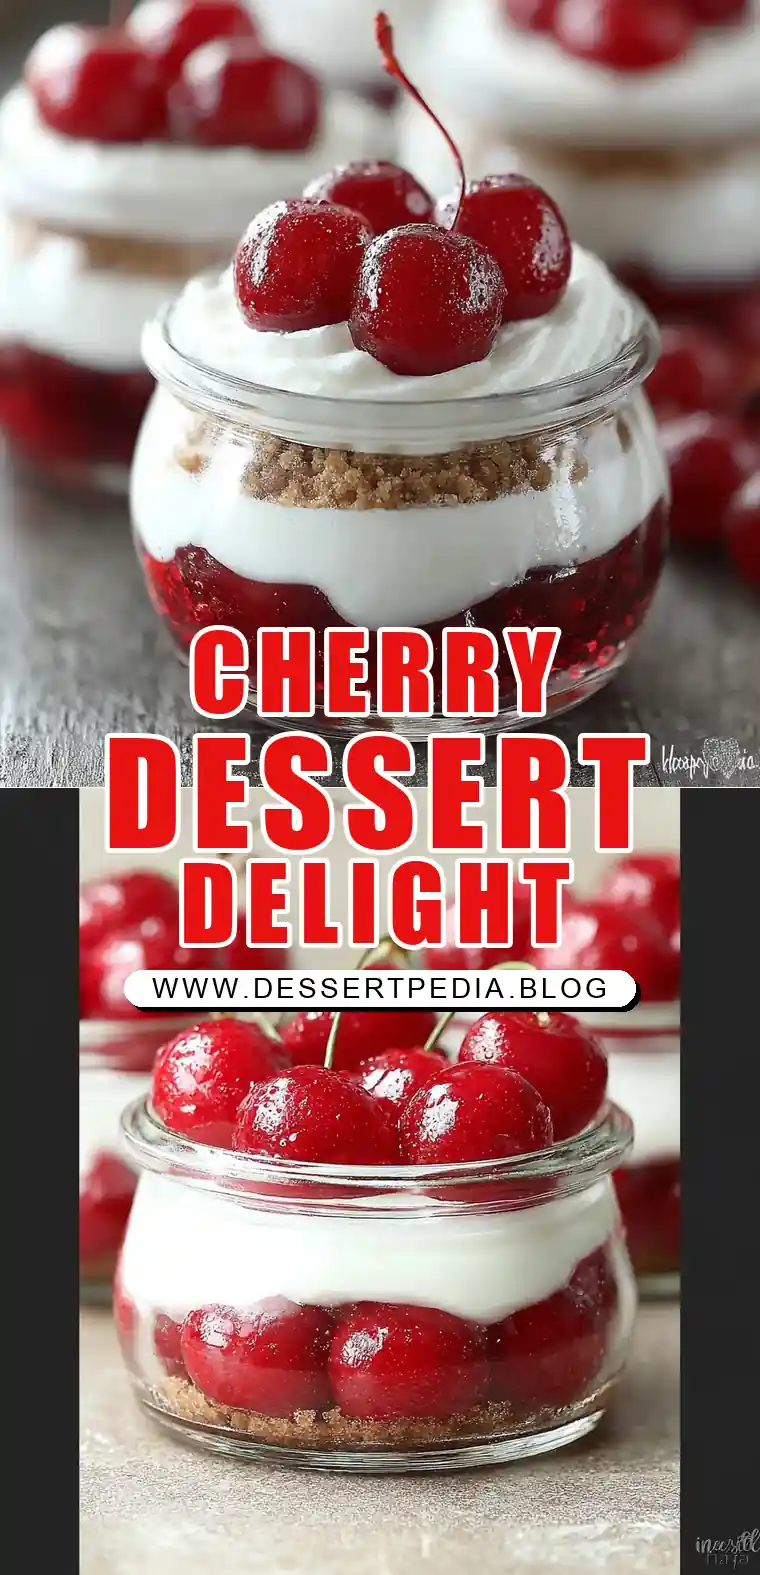
Cherry Delight is more than a dessert; it’s a piece of history, a family tradition passed down through generations. My grandmother’s kitchen was the heart of her home, a place where stories were shared, laughter echoed, and love was expressed through food. The essence of Cherry Delight lies in its simplicity and the joy it brings to those who share it. Each layer tells a story, from the crunchy graham cracker base to the creamy dream whip layer, culminating in the bright, tangy cherry topping.
Why This Recipe Works
Flavor Fusion: The combination of creamy, tangy, and sweet elements creates a harmonious symphony of flavors. The tang of the cream cheese blends beautifully with the sweetness of the cherry pie filling while the graham cracker crust provides a delightful crunch.
Ease of Preparation: With simple steps and minimal equipment, it’s accessible for cooks of all levels. This recipe is perfect for beginners and seasoned bakers alike, ensuring a perfect outcome every time.
Make-Ahead-Friendly: Perfect for preparing in advance, allowing you to enjoy your guests’ company. You can prepare the dessert the day before and let the flavors meld together overnight.
Portion Control: Individual mason jars make serving a breeze and add a charming presentation. This approach not only looks elegant but also ensures each guest gets an equal serving.
Crowd-Pleaser: With its delightful taste and appealing look, it’s bound to impress at any gathering. Whether it’s a family reunion or a casual get-together, Cherry Delight is always a hit.
Ingredients:
- Graham Cracker Crumbs (1 1/4 cups): Provides a crunchy, sweet base. The crumbs can also be substituted with digestive biscuits for a slightly different flavor.
- Sugar (3 tablespoons): Balances the crust’s flavor. Use brown sugar for a caramel-like undertone.
- Salt (Pinch): Enhances all the flavors subtly. A small pinch goes a long way in bringing out the sweetness.
- Unsalted Butter (1/3 cup, melted): Binds the crust together. Ensure the butter is fully melted for easy mixing.
- Dream Whip (1 bag): Adds a light, airy texture to the cream layer. If unavailable, whipped cream or even mascarpone can be used.
- Milk (1/2 cup): Helps create a smooth consistency. Whole milk is preferred for richness, but skim milk works if you’re watching calories.
- Vanilla (1 teaspoon): Infuses warmth and depth. Pure vanilla extract enhances the flavor immensely compared to artificial variants.
- Cream Cheese (8 ounces, softened): Offers creaminess and tang. For a vegan option, use almond-based cream cheese.
- Confectioners’ Sugar (1 cup): Sweetens the cream layer. Adjust the amount based on your preference for sweetness.
- Cherry Pie Filling (2 cans, 21 ounces each): Delivers the star flavor with ease. Opt for organic pie filling for a more natural taste.
Step-by-Step Instructions:
Preheat and Prepare: Preheat your oven to 350 degrees F. In a large bowl, combine graham cracker crumbs, sugar, salt, and melted butter. Mix until well combined.
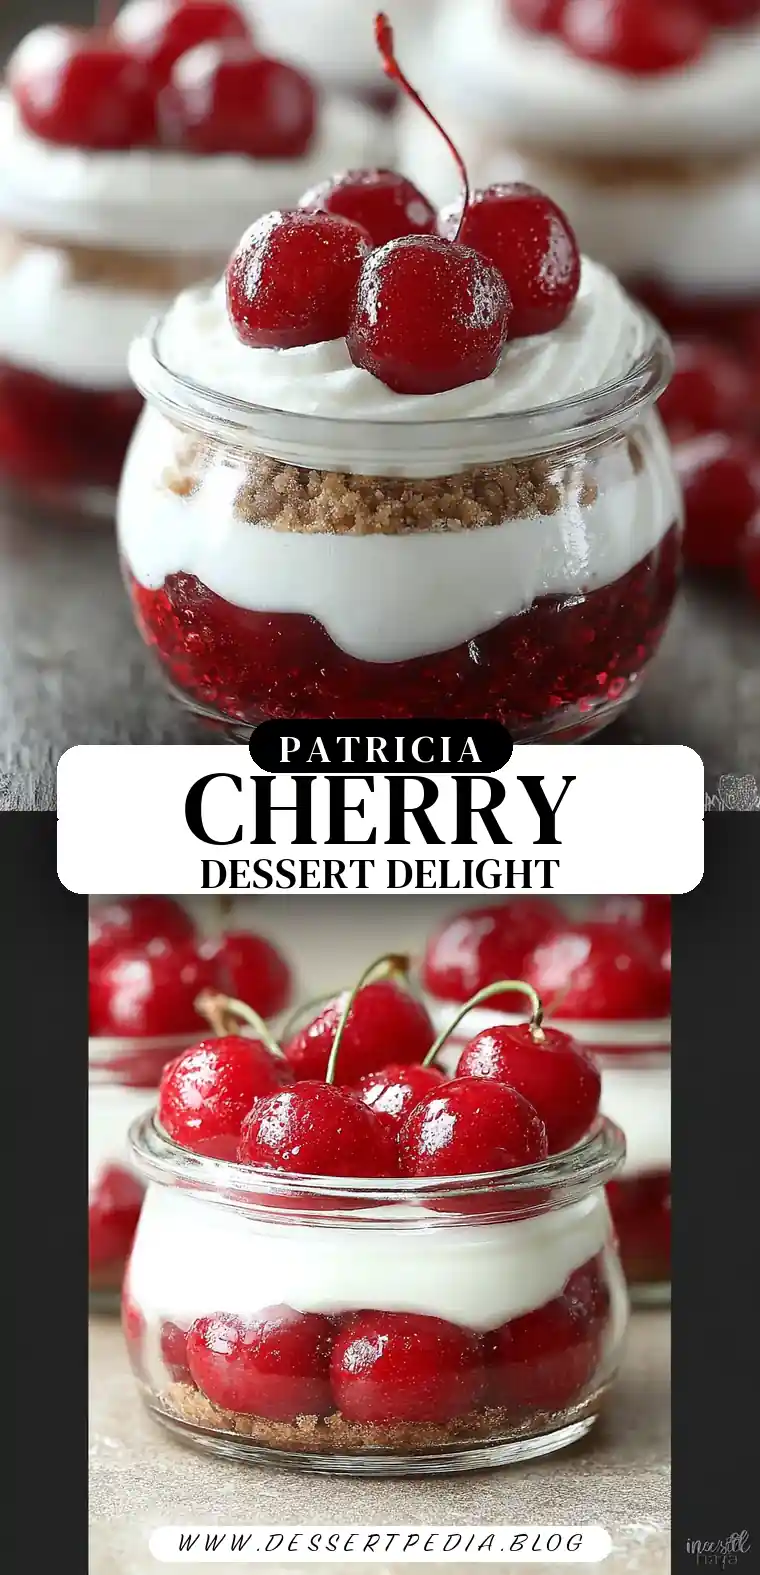
Create the Base: Divide the mixture evenly into 8 wide-mouth mason jars, pressing it into the bottom with your fingers.
Bake the Crust: Place the jars on a baking sheet and bake for about 10 minutes. Allow the jars to cool completely.
Prepare the Cream Layer: While cooling, prepare the cream layer. In an electric mixer bowl, add Dream Whip, milk, and vanilla. Stir to combine, then mix on high for about 4 minutes.
Combine Ingredients: Add cream cheese and confectioners’ sugar to the mix. Beat until silky and smooth, then refrigerate to chill.
Assemble the Dessert: Once cooled, pipe the Dream Whip mixture onto the graham cracker crust in each jar.
Add the Cherry Topping: Top with cherry pie filling. Cover jars and refrigerate until ready to serve.
Prep Time: 20 minutes
Cooking Time: 10 minutes
Total Time: 30 minutes
Yield: 8 Servings
Table: Calorie Breakdown for a Typical Serving
| Calories | Carbs | Protein | Fat | Sugar |
|---|---|---|---|---|
| 477 kcal | 73 g | 4 g | 19 g | 24 g |
Patricia’s Tips for Success:
Tip 1: Use a piping bag for the cream layer to ensure even distribution. This not only makes the layers look neater but also ensures that each bite has the perfect balance of flavors.
Tip 2: Allow the jars to cool completely before adding the cream layer to prevent melting. This step is crucial for maintaining the dessert’s integrity.
Tip 3: For a crunchier base, press the graham cracker mixture firmly. The firmer the base, the better it will hold up when layered with cream and cherries.
Tip 4: Taste your Dream Whip mixture for sweetness before chilling; adjust if necessary. This ensures the dessert meets your personal sweetness preference.
Tip 5: Gently swirl the cherry pie filling for a marbled effect. This not only enhances the visual appeal but also ensures each spoonful is a burst of flavor.
Tip 6: For a smoother cream layer, ensure the cream cheese is fully softened. This prevents lumps and creates a silky texture.
Tip 7: Chill the dessert for at least an hour for optimal flavor melding. The chilling time allows the layers to set and the flavors to blend harmoniously.
Cooking Variations:
Variation 1: Substitute blueberry or strawberry pie filling for a different fruity twist. Each variation brings its unique flavor, keeping the dessert exciting.
Variation 2: Use chocolate graham crackers for a richer, more decadent base. This adds a delightful chocolatey element that pairs wonderfully with cherries.
Variation 3: Add a layer of chopped nuts for an additional crunch. Walnuts or pecans work particularly well and add a nutty depth to the dessert.
Variation 4: Incorporate a splash of almond extract into the cream layer for a nutty aroma. Almond pairs beautifully with cherries and adds a sophisticated touch.
Variation 5: Use low-fat cream cheese and light whipping cream for a lighter version. This maintains the dessert’s taste while reducing calories.
Serving Suggestions:
Suggestion 1: Pair with a dollop of whipped cream and a fresh mint sprig for a touch of elegance. This adds a fresh contrast to the rich flavors.
Suggestion 2: Serve alongside a scoop of vanilla ice cream for a delightful contrast. The coldness of the ice cream complements the creamy layers beautifully.
Suggestion 3: Enjoy with a cup of freshly brewed coffee for a comforting treat. The bitterness of the coffee balances the sweetness of the dessert nicely.
Suggestion 4: Add a dusting of cocoa powder on top for a hint of chocolate. This simple addition elevates the presentation and flavor profile.
Suggestion 5: Present on a dessert stand for an eye-catching display at parties. The layered jars look stunning when presented together, making them a perfect centerpiece.
Additional Thoughts:
Cherry Delight is more than just a dessert; it’s a canvas for creativity and a vessel for memories. Each bite captures the joy of time spent in the kitchen, the laughter shared, and the sweetness of family traditions. Whether you’re crafting this treat for a special occasion or simply indulging in a moment of self-care, it’s a delightful reminder of the simple pleasures in life. As you savor this dessert, let it transport you to a place of warmth and nostalgia, where food is not just nourishment but a celebration of life’s sweetest moments.
Join the Conversation:
I love hearing how Cherry Delight becomes part of your own story. Whether it’s a family gathering, a quiet evening treat, or a new twist you’ve tried, share your experiences and variations. Let’s celebrate the joy of cooking and the magic of sharing sweet moments with loved ones. Your stories and feedback are invaluable, and together, we can continue to create delicious memories.
Conclusion:
Cherry Delight is a charming, flavorful dessert that’s easy to prepare and a delight to share. Its simplicity and elegance make it perfect for any occasion, ensuring that each serving is met with smiles and satisfaction. As you embark on your culinary journey with Cherry Delight, remember that the best recipes are those that bring joy to both the cook and the guests. May this dessert be a cherished addition to your repertoire, bringing happiness and sweetness to your table.
Frequently Asked Questions:
Q: Can I make Cherry Delight in advance?
A: Yes, it can be prepared a day ahead; just store in the refrigerator until serving. This makes it an ideal dessert for entertaining.
Q: Can I use fresh cherries instead of canned filling?
A: Absolutely! Fresh cherries can be cooked down with sugar to create a homemade filling. This not only enhances the flavor but also allows you to control the sweetness.
Q: Is there a non-dairy alternative for cream cheese?
A: Yes, non-dairy cream cheese alternatives work well for this recipe. Look for almond or soy-based options for a similar texture.
Q: How long will Cherry Delight keep in the refrigerator?
A: It will stay fresh for up to 3 days when properly covered. Ensure it’s tightly sealed to maintain freshness.
Q: Can I substitute Dream Whip with real whipped cream?
A: Yes, real whipped cream can be used as a substitute for a richer flavor. Whip it to stiff peaks for the best results.
Q: What’s the best way to soften cream cheese?
A: Leave it at room temperature for about 30 minutes or microwave for 10-15 seconds. This ensures it blends smoothly into the cream layer.
Q: Can I freeze Cherry Delight?
A: Freezing is not recommended as the texture may change upon thawing. The cream layer might separate, affecting the overall quality of the dessert.
Cherry Delight
Ingredients
Equipment
Method
- Begin by preheating your oven to 350 degrees F.
- In a large bowl, combine the graham cracker crumbs, sugar, salt, and melted butter. Mix until combined. Divide the graham cracker mixture evenly into 8 wide-mouth mason jars (about 1/4 cup in each jar). Use your fingers to press the crust into the bottom of each jar.
- Place the jars onto a baking sheet and bake about 10 minutes. Allow the jars to cool completely.
- While your jars cool, prepare the cream layer. In the bowl of an electric mixer with the whisk attachment, add one bag of Dream Whip. Then add milk and vanilla. Stir to combine. Then mix on high for about 4 minutes.
- Next, add the cream cheese and confectioners’ sugar. Mix until silky, shiny, and smooth. Place in the refrigerator to chill while your jars continue to cool.
- Once everything is chilled, evenly divide the Dream Whip mixture among the jars. (I found it easiest to add the mixture to a large piping bag and pipe it onto the graham cracker crust in each jar.)
- Finally, top with the cherry pie filling. Cover with the mason jar lids or plastic wrap and refrigerate the jars until you’re ready to serve the dessert.