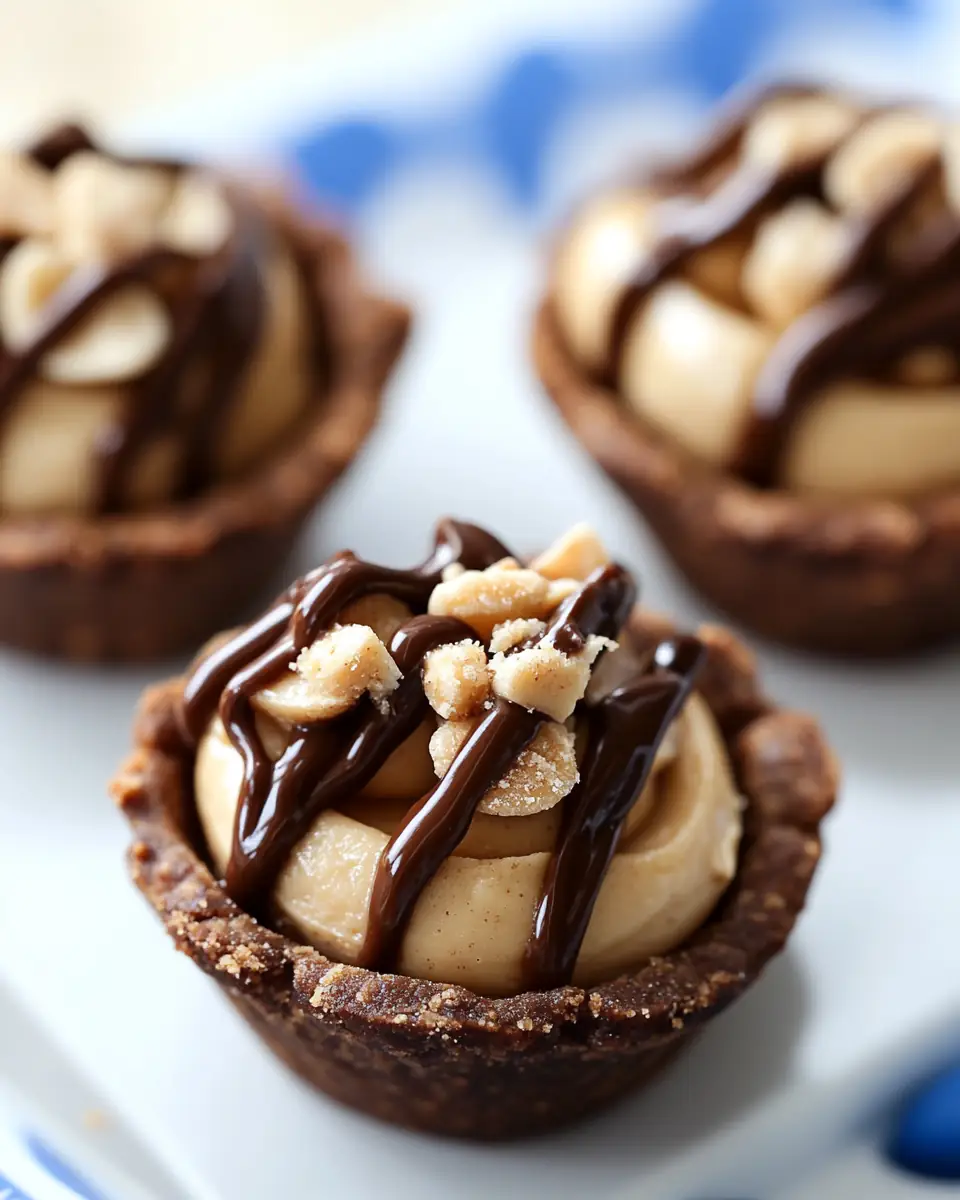
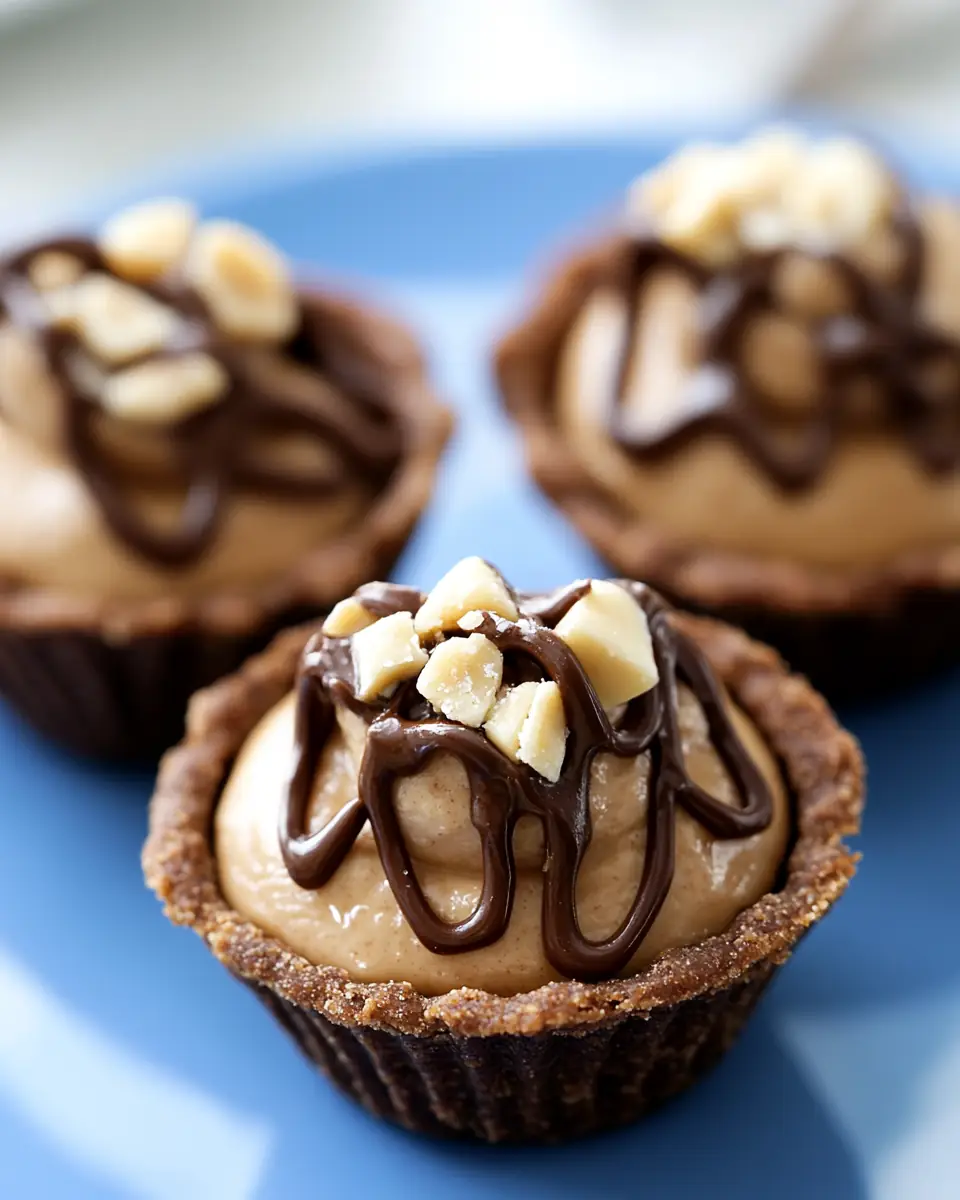
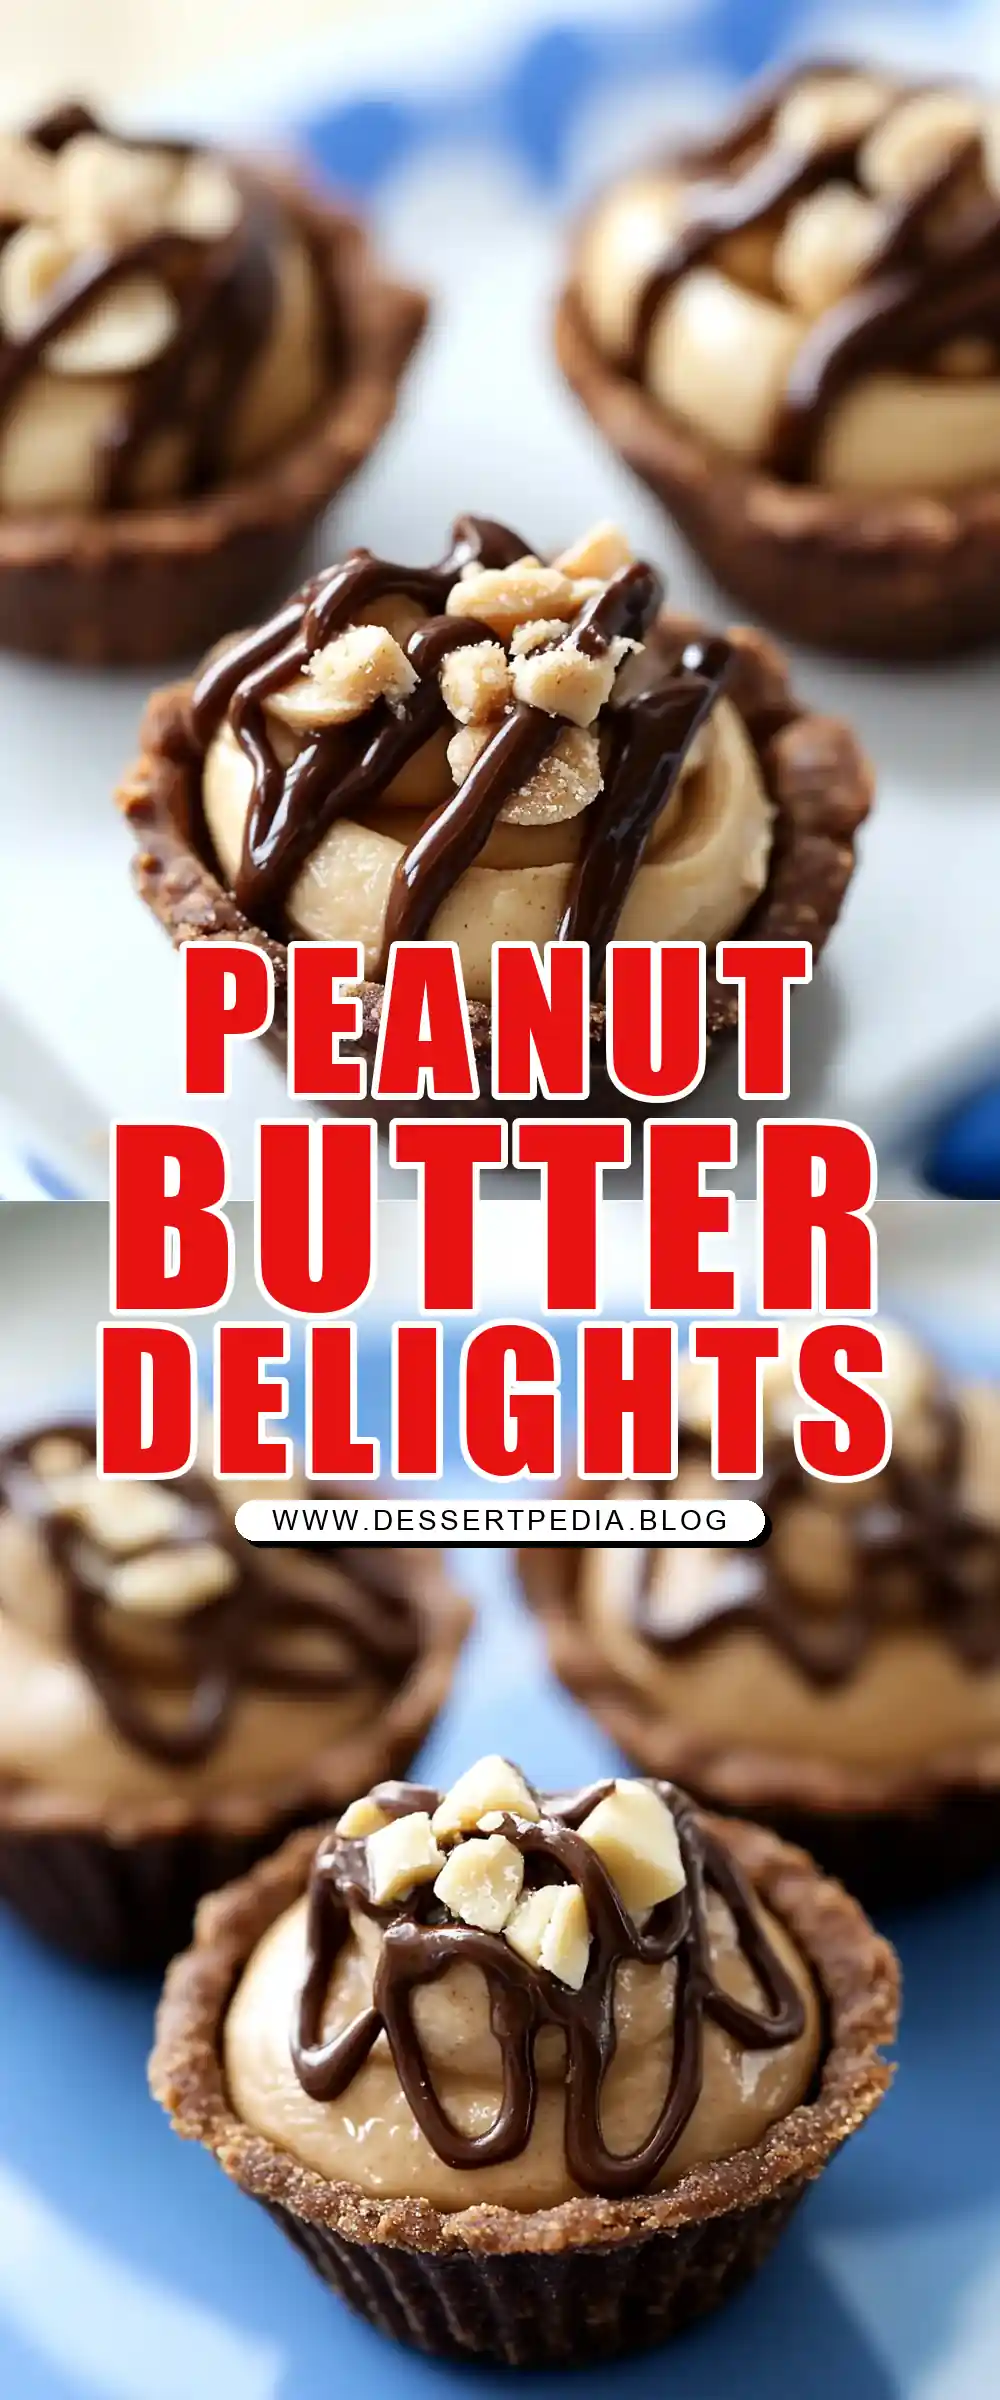
Mini Peanut Butter Pies
Mini Peanut Butter Pies: A Cozy Treat from My Grandmother’s Kitchen
Growing up, weekends meant one thing: the smell of sweet treats wafting through my grandmother’s cozy kitchen. Her baking was legendary, and every bite felt like a warm hug. Inspired by those cherished memories, I created these Mini Peanut Butter Pies to capture that nostalgic warmth in every delicious bite. These pies combine the rich flavors of chocolate and peanut butter with the creamy delight of a no-bake filling, perfect for sharing with loved ones or enjoying as a midnight snack. Easy to prepare and packed with flavor, these Mini Peanut Butter Pies are sure to become a staple in your baking repertoire.
Why This Recipe Works:
• Rich Flavor Combination: Chocolate and peanut butter are a timeless duo that brings a burst of flavor with every mouthful. The slightly bitter cocoa crust pairs beautifully with the sweet and nutty filling, creating a harmonious blend of tastes.
• Simple Preparation: With straightforward steps, this recipe is accessible even to novice bakers. The process is streamlined, making it easy to follow and execute, ensuring successful results every time.
• Perfectly Sized: Mini pies mean perfect portion control and an adorable presentation. They are ideal for individual servings at gatherings, making them a convenient and appealing choice for parties and events.
• No-Bake Filling: The creamy, no-bake filling saves time and effort while delivering luscious texture. This feature is particularly advantageous during hot weather when turning on the oven is less desirable.
• Versatile: Easily adaptable to accommodate various dietary preferences or ingredient availability. Whether you need to make them gluten-free or vegan, small adjustments can transform these pies without compromising their delightful taste.
Ingredients:
For the Crust:
• All-purpose flour: Provides the structure for the pie crust, giving it the necessary firmness and texture. • Unsweetened cocoa powder: Adds a rich chocolate flavor to the crust, enhancing the overall taste profile of the pies. • Sugar: Balances the bitterness of cocoa and enhances sweetness, creating a well-rounded flavor. • Kosher salt: Elevates the flavors and balances sweetness, ensuring the crust is not overly sweet. • Unsalted butter: Contributes to a flaky, tender crust, adding richness and depth to the flavor. • Crisco (vegetable shortening): Ensures a tender, crumbly texture, making the crust light and easy to bite into. • Egg yolks: Bind the dough and add richness, helping to create a cohesive and pliable dough. • Iced coffee: Adds depth to the crust; ice water can substitute, but coffee enhances the chocolate notes.
For the Filling:
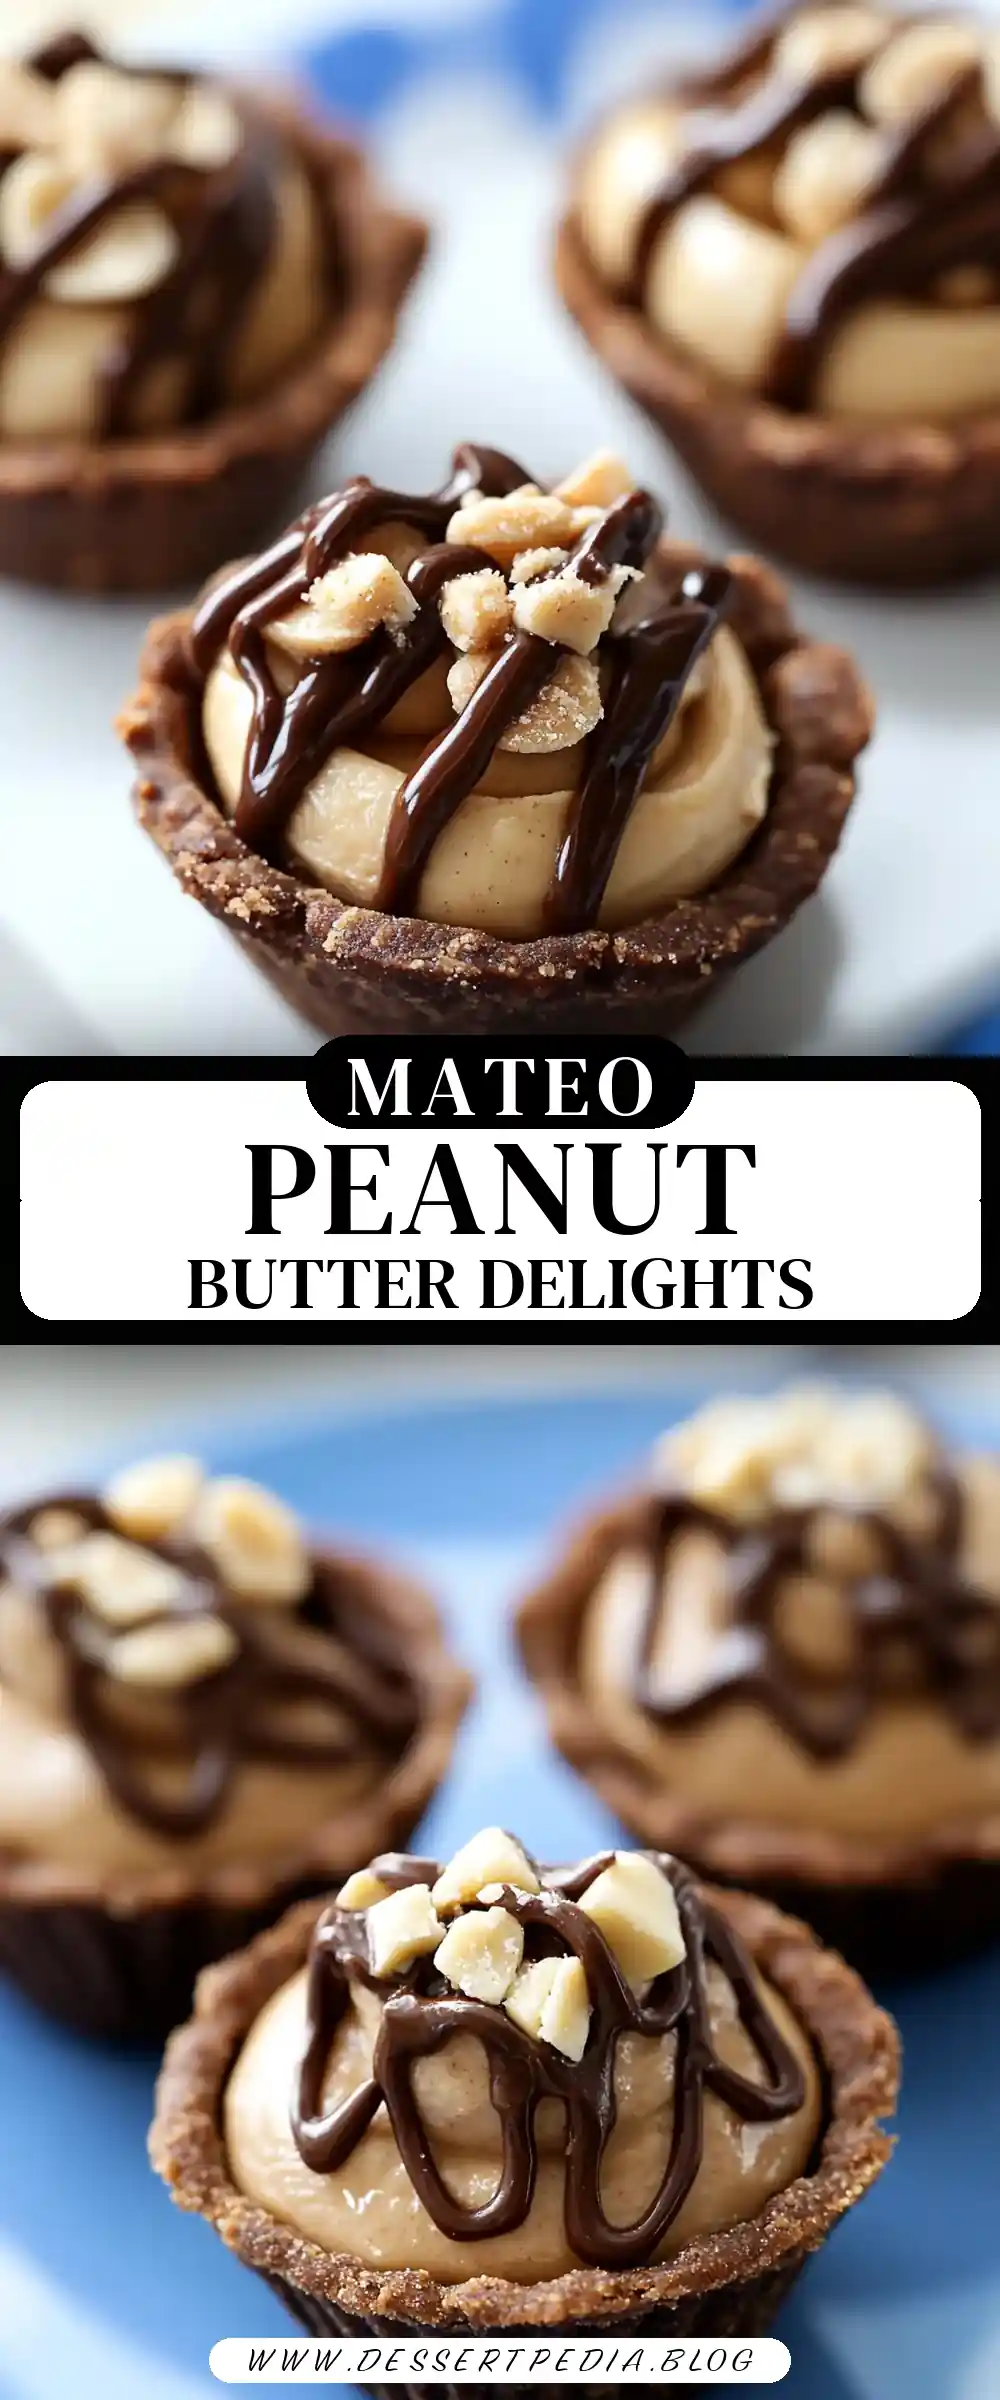
• Creamy peanut butter: The star of the filling, offering creamy nuttiness that is both indulgent and satisfying. • Cream cheese: Provides tanginess and creaminess to the filling, balancing the sweetness of the other ingredients. • Vanilla: Enhances the flavor of the filling, adding a layer of aromatic richness. • Confectioners’ sugar: Sweetens the filling without grittiness, ensuring a smooth and pleasant texture. • Cool Whip (thawed): Lightens the filling, making it airy and luscious, perfect for contrast with the dense crust.
For the Topping:
• Semi-sweet chocolate chips: Perfect for a rich chocolate drizzle that adds visual appeal and additional flavor. • Crisco: Helps in achieving a glossy chocolate finish, ensuring the drizzle is smooth and attractive. • Chopped peanuts (optional): Adds texture and a nutty garnish, enhancing both the flavor and presentation.
Step-by-Step Instructions:
Prepare the Crust:
In a food processor, combine flour, cocoa, sugar, and salt on low until blended. Add butter and Crisco, pulsing until the mixture resembles coarse crumbles. Add egg yolks and iced coffee, processing with slow pulses until dough forms a ball.Chill the Dough:
Divide the dough into two flattened discs, wrap in plastic, and refrigerate for at least 30 minutes. Chilling the dough solidifies the fats, contributing to a flakier crust.Preheat and Roll:
Preheat your oven to 350 degrees F. On a floured surface, roll out the dough to 1/8 inch thickness. Use a 3-inch diameter flower-shaped cookie cutter to cut the dough. Ball up leftover dough, roll it out, and repeat until all is used.Shape and Bake:
Gently press the flowers into an ungreased mini muffin pan. Bake at 350 degrees F for 12-15 minutes. This stage ensures the crust is firm and holds its shape.Cool the Shells:
Allow the mini pie shells to cool completely in the pan before removing them to ensure they keep their shape. Cooling is crucial for maintaining the integrity of the crust.Prepare the Filling:
For the filling, beat peanut butter with cream cheese and vanilla until smooth. Add powdered sugar, beating again, and finish with Cool Whip, mixing until smooth. The filling should be creamy and homogeneous.Fill the Pies:
Pipe the filling into cooled chocolate pie shells using a piping bag or large plastic bag. This method ensures a neat and even distribution of filling.Create the Drizzle:
For the drizzle, melt chocolate chips and shortening in a microwavable bowl. Cool slightly, transfer to a plastic bag, snip a corner, and drizzle over filled pie shells. Garnish with chopped peanuts if desired.
Prep Time: 45 minutes
Cooking Time: 15 minutes
Total Time: 60 minutes
Yield: 4-6 Servings
Table: Calorie Breakdown for a Typical Serving
| Nutrient | Amount |
|---|---|
| Calories | 138 kcal |
| Carbohydrates | 12 g |
| Protein | 2 g |
| Fat | 9 g |
| Sugar | 6 g |
Patricia’s Tips for Success:
Tip 1: Ensure your butter and Crisco are cold for a flaky crust. The cold fats create steam pockets as they melt, leading to a tender and flaky texture.
Tip 2: If dough feels sticky, add a little more flour while rolling out. This prevents the dough from sticking and tearing, making it easier to handle.
Tip 3: Use a piping bag for neat, professional-looking filling. A piping bag allows for precise control, ensuring consistent portions and a clean presentation.
Tip 4: Let the chocolate drizzle cool for a minute before drizzling to prevent it from melting the filling. This step ensures the drizzle remains distinct and doesn’t mix with the filling.
Tip 5: Use a toothpick to help release the pies from the muffin pan gently. This technique minimizes the risk of breaking the delicate crust.
Tip 6: Experiment with different cookie cutter shapes for various occasions. Different shapes can add a festive element to the presentation, making the pies suitable for holidays and special events.
Tip 7: If you don’t have a food processor, use a pastry cutter or forks to blend the dough ingredients. This manual method requires a bit more effort but achieves similar results.
Cooking Variations:
Variation 1: Substitute almond butter for peanut butter for a different flavor profile. Almond butter offers a milder, slightly sweet nuttiness, changing the flavor dynamics.
Variation 2: Add a teaspoon of espresso powder to the crust for a mocha twist. Espresso enhances the chocolate notes, adding complexity to the crust.
Variation 3: Use dark chocolate chips instead of semi-sweet for a richer drizzle. Dark chocolate provides a more intense cocoa flavor, appealing to those who prefer less sweetness.
Variation 4: Try flavored cream cheese, like honey nut, to add another layer of flavor. Flavored cream cheese can introduce new dimensions, complementing the peanut butter filling.
Variation 5: For a gluten-free version, use a gluten-free flour blend. Ensure all other ingredients are gluten-free to accommodate dietary restrictions fully.
Serving Suggestions:
Suggestion 1: Serve with a dollop of whipped cream and a sprinkle of cocoa powder. This classic pairing adds richness and a touch of elegance to the presentation.
Suggestion 2: Pair with a hot cup of coffee or a glass of cold milk. The contrasting temperatures and complementary flavors enhance the enjoyment of the pies.
Suggestion 3: Add a scoop of vanilla ice cream for an indulgent dessert. The creamy, cold ice cream contrasts beautifully with the rich, nutty pies.
Suggestion 4: Decorate with fresh fruit like raspberries or strawberries for a pop of color. The fruit adds freshness and a slight acidity, balancing the sweetness of the pies.
Suggestion 5: Serve in a dessert buffet with other mini treats for a party. Mini pies are perfect for buffets, offering guests a variety of flavors and textures in a single bite.
Additional Thoughts:
The Mini Peanut Butter Pies are not just a treat for the taste buds; they also evoke a sense of nostalgia and warmth reminiscent of times spent in a beloved kitchen. Their compact size makes them ideal for gatherings, ensuring everyone gets their own delightful bite. Whether you’re a novice or seasoned baker, these pies offer a fun and rewarding baking experience. They are versatile enough for customization, allowing you to get creative with flavors and presentations. Making them can be a joyful activity, shared with friends or family, creating memories as sweet as the pies themselves.
The act of baking these pies can be a form of meditation, a way to unwind and focus on the simple pleasures of creating something delicious from scratch. Each step, from mixing the dough to piping the filling, offers a moment to pause and enjoy the process. The outcome is not only a delightful dessert but also a testament to the love and care that goes into homemade treats.
Join the Conversation:
I would love to hear about your experience making these Mini Peanut Butter Pies. Did they remind you of any cherished memories or inspire new traditions in your kitchen? Share your thoughts, tips, or any variations you tried in the comments below. Let’s build a community of passionate home cooks exploring delicious recipes together!
Consider sharing photos of your creations, as seeing how others have personalized the recipe can inspire new ideas and approaches. Whether you’ve added a unique twist or stuck to the classic version, every interpretation adds to the richness of our shared culinary journey.
Conclusion:
Mini Peanut Butter Pies are a delightful way to bring joy and sweetness to any occasion. Their rich flavors and charming presentation make them a standout treat, perfect for sharing with friends and family. Whether you’re revisiting nostalgic memories or creating new ones, these pies are a testament to the love and warmth that homemade desserts bring into our lives. Happy baking!
The simplicity of the recipe, combined with its delectable results, demonstrates the power of homemade desserts to connect us to our past and to each other. As you enjoy these pies, remember that each bite carries with it the legacy of those who have baked before us, and each creation is a new chapter in the ongoing story of culinary tradition.
Frequently Asked Questions:
Q: Can I make the crust ahead of time?
A: Yes, you can make the crust up to 2 days in advance and store it in the refrigerator. This can be a time-saver if you’re preparing for an event or want to break up the preparation into manageable steps.
Q: What can I use instead of Cool Whip?
A: You can use homemade whipped cream as an alternative to Cool Whip. Simply whip heavy cream with a bit of sugar until soft peaks form, and use it in place of the Cool Whip for a homemade touch.
Q: How long can these pies be stored?
A: Store them in an airtight container in the refrigerator for up to 3 days. This ensures the pies remain fresh and the crust retains its texture.
Q: Can these pies be frozen?
A: Yes, freeze them without the chocolate drizzle, and add it before serving. Freezing helps preserve the pies for longer periods, making them a convenient make-ahead dessert.
Q: How do I prevent the crust from getting soggy?
A: Ensure the pies are completely cooled before adding the filling to maintain a crisp crust. Additionally, avoid overfilling the crusts to prevent moisture from affecting the texture.
Q: What if I don’t have a food processor?
A: You can use a pastry cutter or forks to blend the dough ingredients by hand. This method requires a bit more effort but can be just as effective.
Q: Can I use natural peanut butter?
A: Yes, but ensure it is well-stirred to incorporate any separated oils for a smoother filling. Adjust the sugar if needed, as natural peanut butter can be less sweet than its conventional counterpart.
Feel free to reach out if you have more questions or need further clarification on any part of the recipe. Happy baking and enjoy the sweet rewards of your labor!
Mini Peanut Butter Pies
Ingredients
Equipment
Method
- In a food processor, combine the flour, cocoa, sugar, and salt on low until blended. Add the butter and Crisco and pulse until the mixture resembles coarse crumbles. Add the egg yolks and iced coffee and process with slow pulses until the dough forms a ball.
- Press the dough into two flatten discs. Wrap in plastic and refrigerate for at least 30 minutes.
- Preheat your oven to 350 degrees F.
- On a floured surface, roll out your dough until it is about 1/8 inch thick. Cut out the dough using a flower shaped cookie cutter. Gently press the flowers into an ungreased mini muffin pan. Bake at 350 degrees F for 12-15 minutes.
- Allow the mini pie shells to cool completely in the pan before removing.
- Mix the peanut butter with the cream cheese and vanilla until smooth. Add the powdered sugar, beating again until smooth. Add in the Cool Whip and beat the mixture until smooth.
- Pipe the filling into your cooled chocolate pie shells.
- Melt the chocolate chips and shortening. Allow the mixture to cool slightly, then drizzle onto the filled pie shells. Top with chopped peanuts.